• When you click on links to various merchants on this site and make a purchase, this can result in this site earning a commission. Affiliate programs and affiliations include, but are not limited to, the eBay Partner Network.

Updating the Super Street Mopar

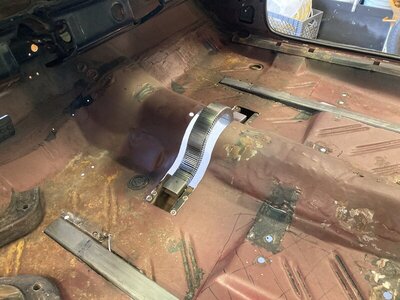
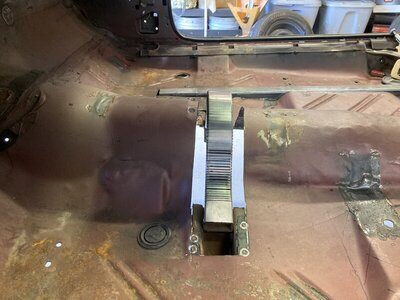
Spent some time under the car yesterday knocking welds down, will continue later today. Once thats done, I'm going to slice the floor where the trans hoop goes in preparation for setting the engine and trans in. I'll just give it a couple of tacks on my potential new unit to hold it in place so I can make sure the fit is good. After that I'll slice the tunnel up in preparation of making the new one. Also I'll order up one of the seat adaptors from Procar so I can make the seat frame that will be welded to the F/C's.
I had my telemedicine meeting earlier today and there are no issues with the plumbing being carboned up so now just need to get the deal scheduled. It will be nice to get this spasm stopped.
 
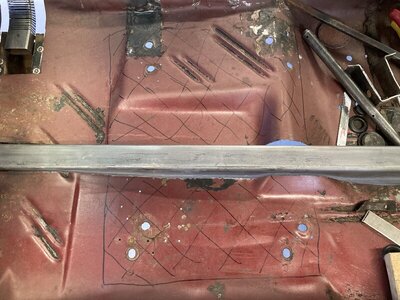
Got the welds knocked down. Not perfect but its not going to be a show car. I did the cut on the floor for the new hoop, will finalize that when the trans is in. Want to make sure there is more room around the unit. The area marked on the floor is the general area where the seat framing will be. This will help eliminate where the floor fatigue is when I fill the area back in later with new pieces.

33ED2C13-48F6-4A57-A803-D784571FFC61.jpeg 161FC1FA-C02A-469D-A3ED-9536981EBB3C.jpeg 88BB5472-FFC2-40D5-813A-990AE4931884.jpeg
 
My universal seat mounts from Procar showed up on Saturday. Today I layed out the positioning for them, made sure they are centered to the steering column, then measured out for the material to get cut. I used up the frame connectors that came with the ART package since the material was 2" square, .120 wall material. Tomorrow I'll cut a couple more pieces for the subframes. They will get welded together and then welded to the 2x4 sfc's I put in. Where I plot out for the bolts to hold the seat mounts to the subframe's, the holes will get sleeves welded into them so its a solid connection and can't crush when tightened.

49C1BB80-77C6-491D-857E-6687ADCE2C54.jpeg


E9DE7743-61ED-42CA-867E-E1B4EF04E4EB_1_201_a.jpeg
 
My "tomorrow" got postponed. I put the Flex on the lift to check things out before my honey did a road trip south. Found some coolant on the rh side frame. Hmmm. Turned out that the upper hose was leaking at the Y connection where it splits off to go to the tank with a small diameter hose. Since its a holiday weekend, no stores were open, my work included. I went to my store on Tuesday to check stock, don't have. Suppliers are 3 days out. Need car put together for roadtrip by Tuesday. Found a hose up in Paso Robles. Fetched it, put it in, alls groovy in Osos now. Today I worked on my little seat subframes. Got them de-burred, welded then ground. Next quest is to get the seat frames lined up on them, punch pilot holes through all, cut some sleeves to weld into the 2" material, drill/cut holes in 2' for tubes, weld them in, drill holes in black seat frames, bolt all together, line them up on sfc units, cut floor away in those areas then weld to the sfc units.

E98D6F1A-FC72-4855-8C35-235CBFF2CB73_1_201_a.jpeg


C2439AAC-BCAC-4EA1-AD75-D19FADAA244C.jpeg


0D9C75EF-CA41-4F81-9E91-269AAAC9963C_1_201_a.jpeg


FF3A24C2-F13A-4A5A-8054-054203FC31D6.jpeg


7EE261A1-1680-46AD-A447-77005CE803A1.jpeg


9CCC6021-E0CD-4B3D-B40F-0C8589DFDA13.jpeg
 
I put in a little time after taking the hounds to the beach for their 5x a week romp. Using the guide block, I put pilot holes in the seat brackets and then the 2" material. After the pilot, I found a cutter that was the right size for the sleeves and cut those out. Marked out and then used the tubing cutter to do the first 4 sleeves. Tomorrow will be taken up with the show in Pismo in the morning, going to put some more time in at work installing the security camera's then go to an Eilen Jewell concert in Templeton in the evening. I twigged on her through my Pandora collection, very good singer with great tunes.

FF05ECAF-4678-4EB6-BFB7-07DAA26A0290.jpeg


3BAFEDB5-72D8-4835-80A1-016D880F3169.jpeg


2AB6EFCA-9352-4CDE-A67E-B319273B0ADA_1_201_a.jpeg
 
Today I was able to cut the floor where needed and got the seat frames in. There sure was another pile of undercoating under the car after cutting the floor with my sawzall. Couple more pieces to put on the t-bar area then I'll start scrubbing rust off in the engine bay. When thats cleaned off I plan on putting it back onto the lift, set the engine/trans back in, check out the clearance of my new t-bar x-member upper hoop over the trans, figure out what I need for the trans tunnel and more stuff to come.

9AF7D263-82DB-4C7A-A8DB-C9865A331D30.jpeg


AF6128CA-BD86-4363-87BE-341D4A3454BB.jpeg


81CB4C82-C4A9-42FA-B9CE-43D117927EFF.jpeg


B477024E-EA67-48EF-A6A2-DACE7B77569B.jpeg


D9A98932-AAC7-4327-8603-1ED047F93107.jpeg


A87144C2-DF6B-433B-BA07-CC7F6241CB17.jpeg
 
I have a subscription to this magazine out of the U.K. called Race Car Engineering. It always has some interesting articles in it, plenty of them are over my head with the physics and other heavy math/tech but there are some articles I glean some thoughtful info from, like what I used for mounting and organizing all of the heat exchange units. In this latest one, there is an interesting section on air intakes to the engine on an older ex Trans Am car being used in a series in Europe. There are many differences between the race car and mine, like the air exit for the radiator, but it still makes me wonder. I have planned to do my air intake like NASCAR where I use the cowl plenum at the windshield base for my air intake to the engine. One of the other reasons I chose this was packaging constraints. I can't use a normal drop base unit as it sits on the fuel rails leaving about a 3/4" gap between the base and throttle body. At the topside, its too tall and hits the hood. I don't want to cut the hood, its pristine other than needs paint, to put a scoop on. So I started working at making a unit to the cowl but did not get very far before we packed up to move here 4 years ago. I'll be getting back on that after the engine/trans are back in for more fit and fab work. Then I get this latest issue of RCE and I go hmmm. When its back in, I'll look at doing something like in the article but with the filter not on the engine due to the space constraints. Enjoy the read by an aero guru out of Jolly Old England.

Scan rce.jpeg


Scan rce 2.jpeg


Scan rce 3.jpeg


Scan rce 4.jpeg


Scan rce 4.jpeg


Scan rce 5.jpeg


Scan rce 6.jpeg
 
While I had the scans going, I made some scans of my past Mopes. Here is my 73 Duster. Originally Petty blue, 340, 3spd manual, p/s, p/db, lsd, bench seat, rubber floor mat, a/m radio. First thing I did to it was find a 4 speed, then a 6 pack with cam change, put a Dana in it cause it was cheap. Later on I painted it, with runs installed by me, mid 70's Ford truck red. After that I built a 372" engine for it. Early 80's build with my working at the speed shop. 360 crank with the mains turned down and tricked out by Hank The Crank[ one of the original go to crank shops], Hemi Nascar rods, W2 heads, KB gear drive, McLeod dual disc clutch, slick shifter Hemi 4 Spd, 4.88's in the Dana, custom roll cage. I let it sit while I was working on the Challenger, getting it ready for paint. When I went to start it, the braided lines leaked like a soaker hose. Back burnered it then sold it to help pay some bills. Had it from 77 to about 99

Scan duster.jpeg
 
Here is the Challenger. I had it from 86 to 07, lost it in the fire that we had to evacuate from. I got his car when I was working at my first dealer, Chevy and Mercedes, when the dealer owners son came to me to see if I was interested in buying it since they didn't want it as a trade in. The guy who owned it was trying to pass it off as a T/A to the sales Dept. When I looked at it, the jig was up. Plain 318, slapstick, a/c[ most was missing then], p/s, manual 10" drums. Later on I ran the numbers on it and found that it was a western sport special, Van Nuys plant. Had 180k on it, lots of worn out stuff but a driver which worked out as I needed wheels since I was doing the 372/W2 build on my Duster. Some time later I went through the suspension and brakes. Did the 11.75" DiscoTech swap, put a b-body 8.75 in it since it was narrower, Kit Car t-bars and springs, sway bars, tires/wheels, brake booster. Drove it for awhile while I built up a 360 for it. Switched that out over a week. Drove that while I replaced the trunk floor and the panel between the back glass and trunk, re-aquired my old 6 pack from the Duster, put that on plus a replica T/A hood. Drove it for a bit then back apart for paint switch to Sublime[ was originally F4 green]. While it was down for paint, engine came out to paint the bay, I figured out a way to make the v-twin a/c fit the 6 pack. Fun car, I miss it but we still had a house to live in which is better than the 54 other residences that went up and left neighbors with nothing.

Scan duster 1.jpeg


Scan duster 2.jpeg


Scan duster 3.jpeg
 
I have a subscription to this magazine out of the U.K. called Race Car Engineering. It always has some interesting articles in it, plenty of them are over my head with the physics and other heavy math/tech but there are some articles I glean some thoughtful info from, like what I used for mounting and organizing all of the heat exchange units. In this latest one, there is an interesting section on air intakes to the engine on an older ex Trans Am car being used in a series in Europe. There are many differences between the race car and mine, like the air exit for the radiator, but it still makes me wonder. I have planned to do my air intake like NASCAR where I use the cowl plenum at the windshield base for my air intake to the engine. One of the other reasons I chose this was packaging constraints. I can't use a normal drop base unit as it sits on the fuel rails leaving about a 3/4" gap between the base and throttle body. At the topside, its too tall and hits the hood. I don't want to cut the hood, its pristine other than needs paint, to put a scoop on. So I started working at making a unit to the cowl but did not get very far before we packed up to move here 4 years ago. I'll be getting back on that after the engine/trans are back in for more fit and fab work. Then I get this latest issue of RCE and I go hmmm. When its back in, I'll look at doing something like in the article but with the filter not on the engine due to the space constraints. Enjoy the read by an aero guru out of Jolly Old England.

View attachment 1301387

View attachment 1301388

View attachment 1301389

View attachment 1301390

View attachment 1301391

View attachment 1301392

View attachment 1301393
You could always do like the tools cars from Ford run intake tubes to headlight bezels. Just a thought.
 
For sure. Once I have the bay filled again, it will be one of many things to contemplate.
 
I did some work on the car today while a freind of mine was using the lift to work on his VW Synchro van. I cleared the tools out of the inside, wiped the dust off the paint then bagged it so I could keep dust off of it. Repositioned the stands under it so there was plenty of work space to allow me to poke it out of the garage while I started scrubbing rust off. The Eastwood SCT works ok but I'm going to have to blast it because of the heavy rust build up. Oh well. I want to get the bay cleaned of rust then treat it with the Ospho before it goes on the lift for more fabbing when the engine/trans are in.

2EF106FE-24E4-4A81-9DC6-0A1409A7177F.jpeg


A8A2AC91-1BA6-43E7-9AEC-749CCF4955FD.jpeg


39891F4A-8852-4735-A1CC-2784926B7C27.jpeg
 
When I was coming back from my pre op exam at the doc today, I had an epiphany. I hadn't tried the old twisted wire cup brush for my grinder on the rust. It removed quite a bit of rust. Went from about 3/4" length on the wires to just barely sticking out. Will still need to blast but should not take as long. Going to check out the local venues tomorrow to see what's available for blast media.
 
I have had good luck with Red Garnet, 50 grit.
The wire wheel...Do ALL of them shed wires like a crackhead loses teeth? I always get wires in my clothes and legs!
 
It shedded for sure. Had one long wire imbedded in my leg just barely sticking out like a splinter. Almost 1" long. The twisted unit works well and lasts longer than the regular. Was going to check with the TSC in SLO to see if they have the garnet after reading your prior experience.
 
I spent some time doing more wire wheeling to lessen what the blast has to do and from there, put the hard wheel on to knock down some of the welds. I was able to remove quite a bit off of them. From here, I'll get out the angle air grinder with the hard backing plate to get them down the rest of the way. I'm going to see how much more I can do from now till next Tuesday on prep and clean. I did get some Garnet in, 100 grit in two 50lb bags. I'll put a big tarp down to collect material for re-use when I blast. The remainder of the media will get put into my blast cabinet. From Wednesday till upwards of two months, depends on what the doc says, I'll be out of commission as on Thursday I'm getting some neurosurgery done down at USC. I've had a facial spasm on the lh side for about 8 years now and as time has gone on, the spasms are more frequent and annoying. Doesn't hurt but its tough trying to do stuff with only one eye open. They go into the locker, after cutting an access hole, to move an artery away from the nerve its irritating, put a teflon sponge in between to stop the pulse transfer, then back out and put a titanium plate on to cover the hole. I can't wait to get this done. The success rate is pretty high but I can be anywhere from no spasm to less than what I've got now. Its called microvascular decompression for trigeminal neuralgia and hemifacial spasm. I let my boss know what's up last week so he can fill my position at work. Going to find someplace else to work when I'm good to go as my two co-horts on the parts counter are flaming azzholes.

B8506C6D-B07F-42CD-B9B9-9A41A6DD944E.jpeg


E898C586-A89C-426D-A87A-764B4091AD7F.jpeg


E24D4DB8-D91A-404F-A5BB-7AF527D3206A.jpeg


6E295A99-8D04-48A7-B1DC-DCA48B92D21D.jpeg
 
Great news, the spasm is no longer! So flipping happy about that. As an interesting side benefit, I can see in focus with definition from say 15' to infinity. Was not expecting that. I'll dig out my old Ray Bans that I keep in the truck as a back up pair of shades. Next Tuesday the stitches come out.

79E661BF-A977-4108-9E59-180A646BD5BA.jpeg
 
I spent a little time today doing car stuff. My Powermaster 9523 starter came in so I spent some time fitting things up. I tried all 4 adjustment holes and this one works the best. If I went one more rotating the connections closer to the block, they end up touching. On the header side, there needed to be some thumping on the tube with my plastic shaping hammer. I marked out where it needed help, then tuned it up. Up on the flanges to the head there is some interference at the head studs, so those areas got marked for future clearancing. This was the reason I ordered the headers raw without any coating. I stopped for the day as I have a headache brewing and some minor spasms going on. Friday I felt pretty good so I vacuumed the house. The end of the day I paid for it, needed a multi ice pack session to quell the headache. Doc was right on having to lay low for 8-12 weeks on activity but it was nice to do some housework plus time on the car.

94E7A9BF-5334-4346-9EB2-56F716025746.jpeg


DA2673F0-C26D-4D1C-A910-9D8B03A7B2A2.jpeg


C44CE8E0-2020-4D06-84A7-BD6A2888B9CF.jpeg


F8FF2C60-DD92-40F2-90D7-DC8DF15E0F7A.jpeg


B162D66C-57DC-4B0B-9745-3217A8191F37.jpeg
 
Since the healing is just about done and can actually do some work, like some house cleaning, I spent some time in the garage yesterday. I swapped out the k frame I'd been prepping, it was mounted to the engine, for the un-altered k that I have as a spare. It was a bit of a challenge getting the stocker in there until I realized the other unit had some areas trimmed from before for pan and oil line clearance. Once I pulled the stocker off and cut/smoothed the offending areas, I got it into place. I trimmed off some of the excess bracket material I had marked out before and trimmed the lh engine mount bracket a little more to increase the clearance to the oil line. Tomorrow I'm going to see about getting my modded unit shot or sand blasted before I continue the work on the topside. Its gained some surface rust from being in the trailer for 4 years plus I saw some weld slag in the future work areas from when it was made back in the day. Don't want that stuff around if I can help it when I continue on the welding and adding pieces. This coming week I'm going to mask off the firewall holes and add some more bagging in preparation for sand blasting. The first week of October is clear, schedule wise, so I'll get the blasting done and wash down the clean areas with some Ospho. After that I'll grab 3 assistants to maneuver the car to the other side and get it on the lift. After its positioned, I'll get the engine/trans combo into place, get some support under the structure in various areas, drop the diff and springs out, then get back on the fabbing and improving. Lots of stuff to do while its on the lift. I'm going to rearrange the empty stall so I can park my truck inside. That will be pretty nice for a change.

86E9EFF3-2326-4AD5-8CE2-9F6E59318B65_1_201_a.jpeg


25F0448A-5484-417B-9224-DEB959C3F996.jpeg


8E30D54E-5044-4009-97AA-3B6BFC2CD5DA_1_201_a.jpeg


00C5976B-D77E-438E-B19D-9AF752289E19_1_201_a.jpeg
 
Auto Transport Service
Back
Top