• When you click on links to various merchants on this site and make a purchase, this can result in this site earning a commission. Affiliate programs and affiliations include, but are not limited to, the eBay Partner Network.

Viper T56 install

Not allot going on, I did however get the new yoke installed (very nice piece) and got the tranny wired up. I'll show some of the cool things I got for wiring for anybody who's sick of the typical auto parts store junk.

Here's the connectors and all of the little pieces.

DSCN9657.jpg

Check out how perfect this crimp is, that cost me $60.00!!!!!!! I finally broke down and bought a W crimper for these things and I don't regret it. I may be a little **** about wiring but it comes from allot of youthful stupidity so I've learned my lesson haha.

DSCN9653.jpg

DSCN9660.jpg

The finished product.

DSCN9661.jpg

DSCN9662.jpg

Another cool thing I picked up is these super cool zip ties, just drill a 1/4" hole, shove them in and secure your wires (love em).

DSCN9663.jpg

DSCN9664.jpg

And the new 1350 yoke.

DSCN9667.jpg

- - - Updated - - -

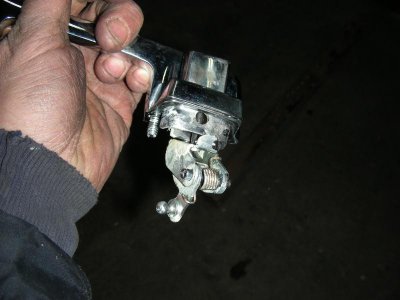
Sorry about the door handle pic but since it's here I'll explain, this turd cost me enough embarrassment last year (locking me out of the car) so it was time to see what was going on. This is a brand new Trim Parts door handle and you can see how the tab isn't in the hole where it's supposed to be and of coarse the screw came loose too. I had to put it in the vice to get the tab bent to where it is fully engaged and then RED LOCTITED the screw in, is it really that hard to make a good handle?
 

Attachments

  • DSCN9673.jpg
    DSCN9673.jpg
    47.2 KB · Views: 442
You crimped your seal wrong,
The weather pack has 3 tabs on it. The seal goes on the opposite way you have it and the small end of the seal is crimped to the wire with the big tabs on the connector end.
The other 2 tabs on the connector end crimp the wire tight to the connector itself.
With the seal crimped to the wire it prevents moisture from getting between wire shield and the seal.

Thanks for the heads up, I was wondering why those damn tabs were so long :thinker:. The 2 tabs are making the electrical crimp but the 2 that go around the seal are just biting the insulation like you see most crimps. I'm not going to worry about the one side because I used 14 gauge wire which was a really tight fit and the clip that folds over the back has the seals held in tight but I may re-do the tranny side that had 16 gauge since they weren't nearly as tight. Thanks for pointing this out.
 
No worries. If you have crimped as many of those as I have over the years, it just becomes second nature.
Those pliers ARE the cats MEOW! I have a set. Only way to crimp weather packs for sure!
 
The shifter showed up today and no surprise it fit's! To bad it won't do anybody any good seeing how it's discontinued but the Core shifter for the Viper cross references with it. This shifter just looked allot better in quality than the Core shifters to me plus it was only $99.00 so I hope it last quite a while but if not I know what to look for now. I measured the ball diameter, arm length, bolt pattern and then mounted it to find a nice tight pattern. This is the description "HURST-391-5072-BILLET-PLUS-SHIFTER-FOR-T-56". Oh yeah, the handle bolts on with 2 bolts just like I wanted and this lever will be discarded for a custom made pistol grip but for now I have a shifter.


$_57.jpg


Now it's just the driveshaft!
 
Anybody have experience with the quicktime bell housings? I was hoping getting the bushing in the starter would take care of the issue that I had with the TKO setup I had but it didn't. It doesn't grind or anything but feels like the starter is bottoming against the flywheel and needs shimmed. I ask because with headers it's nearly impossible to get in there to measure it.
 
I got allot to knock out this weekend but with the shaft ordered and the weather looking up (crossing my fingers) I'm hoping to get the first test run soon. Have an issue to work out on the new Carb and then I plan to mount a GoPro in the cockpit with a view of the tach, speedo and shifter just to provide the best possible example of just what this setup is going to do. The problem is that the clutch requires a pretty lengthy break in so I'll focus on the only thing that really matters with this install and that is the freeway cruising. Curious to how the 456 will do being pulled down to 1,500-1,600 rpm at 70 mph and whether or not it will pick up speed or pull the hills that far down in the rpm's or not? We'll see but I think this is what everyone wants to see.
 
Can't wait for that GoPro footage. I'm positive your 456 makes the torque to pull the hills no problem but that's where it's going to come down to your satisfaction on how well it does it to guage a jump to 4:10's or not.

Any timeline on the driveshaft?
 
Didn't ask but these guys usually don't drag their feet, I'd say easily before next weekend. The starter is the biggest concern right now since I haven't even had a chance to look at it and it's burried in headers.
 
You wanted a time frame.... how about today! I dropped it if right before they closed yesterday and they called today and said it was ready, that's service right there haha. It did come in a bit over the quoted price ($285 instead of $225) but I did make sure to tell him it was going to get hammered, cranked to a pretty ridiculous rpm and to not worry about saving cost just make it right so I'm fine with it. Now if I can just find time to get it?
 
Here's the beginning of the shifter handle, the bottom portion is hidden under the console but puts the shifter right in my hand. It's a couple of pieces of scrap Titanium that will get welded together and built up to blend the wooden grips in like the factory ones.

20150314_152510.jpg

Here's what I've got done on the grips after allot of sanding, still needing cleared which will really bring out the Curly Maple.

View attachment 245695

The brand new 3 1/2" tube driveshaft with Spicer 199 universals.

View attachment 245696

This pictures shows the clearance issue with the mini starter (Quicktime says you have to run an OEM starter).

View attachment 245697

Here's my fix for a neutral safety, I just used an extra brake switch bracket and drilled a couple existing holes out to 1/4' to bolt it up. I'm just running a universal brake light switch to provide the ground to the factory starter relay. The downside is you only have to push the clutch in a small amount to allow it to start but it will remind you to push it in and if you choose to not fully disengage it than I guess it's your own dumb *** fault for not doing it right.

View attachment 245698

This pic clearly shows the difference in the starters, notice how much more meat is on the mini right where it meets the block. The only thing I can figure is Quicktime mounted the starter slightly lower meaning it had to move in as well causing the tight spot. Should have it all wrapped up this weekend.

View attachment 245699

- - - Updated - - -

For the reverse lockout I cut the connector off of the brake light wire (on the brake light switch) and crimped this one on, now I simply plug the 12V solenoid wire into the extra blade and ground the other and it won't let you shift into reverse unless you have the brakes applied.

View attachment 245700
 
She's ready! Buttoned it up tonight, reverse lockout works, clutch pedal safety switch works and it moves forward and reverse.:headbang: Tomorrow is go time!

- - - Updated - - -

The OEM starter seams to have resolved the starter issues as well and fits nicely with the Hooker Super Comps.

View attachment 246565

View attachment 246566
 
Finally got to drive the Charger yesterday with the new 6 speed and all I can say is HOLY COW whoever said you can't have your cake and eat it too never had 2 overdrive gears. The shifting is way better than the TKO with it sliding right into every gear and the McLeod clutch seems to works well also.

I wanted to see how nice it shifted under hard acceleration so I got on it out on a country rd and was doing 80mph in no time, I look down and I'm only @ 2,500 rpm and still had another gear to go.:headbang:. Pretty sweet, I'll post a video as soon as I get the rest of the interior in.
 
I gotta tell ya, for something so complex and custom, you sure made it look like a bolt in! Congrats, man, enjoy the hell out of it! Probably the first thing on all of out lists is an extra gear... and you got two!!!
 
I gotta tell ya, for something so complex and custom, you sure made it look like a bolt in! Congrats, man, enjoy the hell out of it! Probably the first thing on all of out lists is an extra gear... and you got two!!!

X2 on that HT413 . . . 747 Mopar does have a knack for making it look EASY ! ! !

Can't wait to see the "new" Charger in person . . . it's gotta be a BLAST to drive ! ! !
 
The snow rained on my outside work today so I snuck out to the garage and got to work on finishing up the shifter since it's the one time consuming thing left to button up the interior. Since you'll only see the top portion I'm not going to bother polishing up that area but here's where I'm at. I've never really liked chrome or polished anything so I'm going for the brushed look with the Titanium and have FINALLY sanded all of the sanding scratches out of the Maple handles and re-stained them so all that is needed to finish them is the clear. I'm super excited too get this in the car.

I must say I'm pretty tickled with the welding my dad did too, I milled it out and then told him to weld a top on it and build it up under the handles so the wood would blend into the metal and he nailed it.


DSCN9716.jpg

DSCN9715.jpg

DSCN9714.jpg

- - - Updated - - -

I gotta tell ya, for something so complex and custom, you sure made it look like a bolt in! Congrats, man, enjoy the hell out of it! Probably the first thing on all of out lists is an extra gear... and you got two!!!

Things tend to look easier when it's just snap shots....... if you would like I can snap a few pics of me throwing crap and cussing haha. Thanks HT.

- - - Updated - - -

X2 on that HT413 . . . 747 Mopar does have a knack for making it look EASY ! ! !

Can't wait to see the "new" Charger in person . . . it's gotta be a BLAST to drive ! ! !

You know your welcome to drive it whenever you want!
 
Since that pretty much does it for the install I just wanted to say Thanks a lot for taking the time to do this thread and the step by step. I personally greatly appreciate it and I'm sure many others will to come.
 
I second goon's thoughts - I have been lurking on this thread the whole time. Although I am not personally planning on putting in a six speed at the moment, it is cool to watch all the skill and construction that went in to this project. Nice job!
 
Auto Transport Service
Back
Top