• When you click on links to various merchants on this site and make a purchase, this can result in this site earning a commission. Affiliate programs and affiliations include, but are not limited to, the eBay Partner Network.

Lookie what $5000 buys you....

I did have this Force 10 in my red car. I had a leak at a fitting and blamed it on the master cylinder. I swapped to another one and found that the fitting itself was to blame. I shelved the Force 10 MC, figuring I'd find a place for it somewhere, eventually.
I'm not afraid to spend a buck but it is fun looking for creative ways to do things as cheap as possible.
The manual master cylinder I had was a 15/16" and because it was manual, the pedal travel was a bit more than I liked. Having a power assisted system often means you can go slightly larger bore since the boost will reduce the effort to stop the car. When I was screwing around trying to make hydroboost work, I had a 1 1/8" master cylinder for it. Without boost, THAT would take a LOT of leg force to stop a car.
 
Mixed results today.
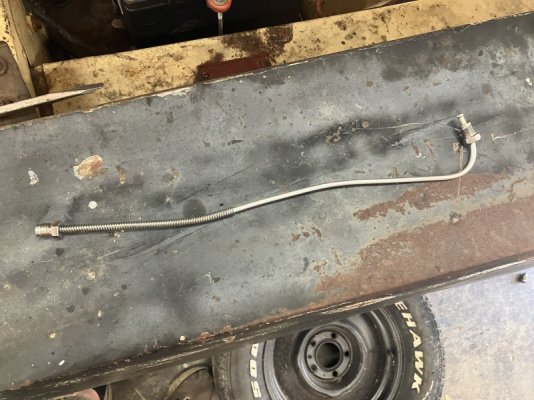
I made two lines, the ones that go from the master cylinder to the proportioning valve. Years ago I bought an Eastwood flaring tool. Compared to the stuff you get at a local auto parts store, this Eastwood tool is like comparing a microwaved steak to a bar b que steak

IMG_1735.jpeg


The flares turn out nice with this tool. The bottom makes a sweeping 90 degree turn.

IMG_1736.jpeg


I left the top straight to determine the bend as needed.

IMG_1737.jpeg


I do like the look of the Force 10 unit.

IMG_1726.jpeg


Rear most line.

IMG_1738.jpeg

IMG_1739.jpeg


I like that spiral covering. I put it on both lines from the proportioning valve to about 5 inches up.

IMG_1740.jpeg


The lines went in and tightened up nice. When it was time to bleed, the Force 10 acted up. I got no fluid to the rear. I tried the right front caliper and got one burst, then nothing. Why?
 
Backing up a bit….
This unit:

IMG_1749.jpeg


It works quite well on the later design aluminum and plastic master cylinders with the two caps.

IMG_1751.jpeg


It screws onto one section of these plastic master cylinders.

IMG_1752.jpeg


Both caps on those master cylinders are vented so you have to remove both caps and then cap the unused one with a sealed one. If you leave the vented cap in when using the bleeder unit , it won’t pressurize. Fluid will pour out the vented cap.
After you get it set up, you pump it to 15 psi then crack open one bleeder at a time. Again, this works great for the cap master cylinders. For the traditional types…

IMG_1748.jpeg


They provide this plate….

IMG_1753.jpeg


It has a rubber seal that supposedly seals to the top of an uncovered master cylinder.

IMG_1754.jpeg


To hold it in place, they include this Harbor Freight quality chain setup.

IMG_1755.jpeg


Two chains like this one are supposed to wrap under the master cylinder to hold the plate in place.
Yeah, the plate would stay in place under 40 mph winds but over 4 psi, it puked brake fluid like a 280 degree radiator pukes anti freeze. I guess I could have tried clamping the plate with this….

IMG_1758.jpeg


See the hose attachment here?

IMG_1757.jpeg


I think if I took a spare master cylinder cover like this….

IMG_1739.jpeg


If I welded a bung on the left side, the hold down spring could still function since it swings up from the right. This would allow me to do the one man pressure bleed on the two common types of master cylinders without leaking. DOT 3 leaks on crappy paint like this isn’t catastrophic but if the car were painted nicely, I’d really be pissed.
 
The brakes feel okay.
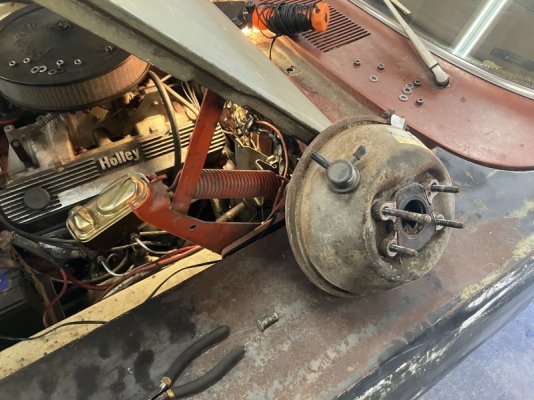
Power brakes often have shorter pedal travel than manual, at least that has been my experience with these cars anyway. I changed to this booster because I didn’t like the pedal feel with the manual setup. This travels less and stops okay but it is nowhere near as good as a non power front disc A body. I thought maybe it needed more idle vacuum.

IMG_1747.jpeg


14” of vacuum isn’t great but I drove the red car with similar readings. This is in neutral though. In gear it may be half of this. When the vacuum hose to the intake is disconnected, the rpms go up so it likes the additional air. I turned the idle mixture screws in a full turn and the rpms went up and idle vacuum went to 17. It didn’t seem to stop any better. I can get the front tires to skid and if I’m in neutral, it stops okay. I don’t think this booster is bad but something is not quite right. The car has a 9.2 to 1 383 with a 280/474 cam with a decent idle. It isn’t choppy. Maybe it is the booster? I do have spares to test…
Oh, last thing for now… tires.
I did drive this on the freeway 2 years ago to an indoor car show 25 miles away.

IMG_1760.jpeg


On tires like this.

IMG_1744.jpeg


IMG_1745.jpeg


How old are they ?

IMG_1742.jpeg


Mid October 2006 ???
The right front is from 2005. The rear tires are 2016 and 2017. I used to not worry about tire age. My daily driver pickup wore the tires out long before the 10 year mark where many suggest to replace them. Some tire stores have a 7 year mark where they won’t service anything older than that. Before this car goes too far from home, I should figure something out. These tires and wheels will not be the final choice when the car is painted so spending $800 or more for tires to go on steel wheels seems silly when I will eventually put a set of bigger aluminum wheels on.
(NO 20” wheels though!)
 
Last edited:
I have the same style bleeder, made a couple proper clamps for the plate, and trimmed the sides of the plate... Doesn't leak a drop....

tempImageCWpD6J.png


BTW I had the orange towel under the M/C cause it had leaked so badly with the original clamp design.. Don't need the towel anymore..
 
Yeah it worked, it was just a pain to get the clamp just right since the MC is round on the bottom and it would want to slide out of place the first couple of times. Next time I will try the ratchet type of clamp that has rubber feet.
 
I have the same style bleeder, made a couple proper clamps for the plate, and trimmed the sides of the plate... Doesn't leak a drop....

View attachment 1896235

BTW I had the orange towel under the M/C cause it had leaked so badly with the original clamp design.. Don't need the towel anymore..
I almost whipped something up like that out of wood, then saw a c clamp on a shelf
 
The idea of putting a bung on a stock cover is great but since the front and the rear reservoirs are separated, I'd have to put bungs on both sides. Maybe it might make sense to make something like this:

1754285755392.png
 
I celebrated Torsion Bar Tuesday early!

IMG_1647.jpeg


To repeat, a FBBO member from here in California gave me these.

IMG_1648.jpeg


The skinny stock ones slipped right out with the tool.

IMG_1761.jpeg


IMG_1762.jpeg


The tool ?

IMG_1778.jpeg


Just for grins, I was curious about the difference in weight of skinny bars versus bigger ones.

IMG_1769.jpeg


IMG_1768.jpeg


Next up, the PST set.

IMG_1770.jpeg


When I put this car together, I had no intention of keeping these skinny torsion bars. I didn’t even put grease boots in.

IMG_1763.jpeg


The 1.03 bars added 5 lbs !

IMG_1766.jpeg
 
How is the ride?
Adding .015 to the thickness will make a difference. In 2015 I went from 1.0 to 1.15s in the red car but I also changed from KYB shocks to Bilsteins at the same time. The car actually rode better with the new combination. The bigger bars with great shocks were a superior setup.
Jigsaw feels a lot more stable. Less bounce, less lean and steering feels more precise due to reduced body roll.
Now I’m going back to figure something out with these brakes. The pedal is really firm like the booster isn’t getting enough vacuum. I wouldn’t have thought that this cam was too wild for power brakes.
I've been told that one test for brake boosters is....press down on the brake pedal then start the car. The pedal should drop some.
I'm not getting much travel with the pedal at any point but I do notice that with the transmission in neutral and the engine revved, it does stop better. That points to a failing booster or too little vacuum.
 
Last edited:
Sometimes, a project tests you and makes you rethink what you think that you know.
I'm not a trained mechanic. Like most of you guys, I'm just an enthusiast that has wrenched on these since I was old enough to drive.
I've been through the wringer with the red car....

GG Z1.JPG


That car started out a 4 wheel 10" drum model, followed by a 11" power front disc setup from a 75 Dart, then 12" discs from a Cordoba, etc etc...
I've dealt with manual brakes, A body single diaphragm boosted brakes, The A body booster with a vacuum pump, B body booster with a vacuum pump and hydroboost.
There are a few guidelines that you learn after trying the common combinations.
Low engine vacuum due to rowdy camshafts mean you need either a manual master cylinder, a stock type vacuum booster with a vacuum pump or hydroboost.
How much vacuum do you need to adequately serve the power booster?
That is subject to debate. Many stock engines produce well above 18" of vacuum at idle in neutral. The red car has a vacuum pump that generates 20" of vacuum which is more than enough. The Lunati cam is so wild, it only makes about 9-10" of vacuum at idle!
I've driven the red car with an A body single diaphragm and 17" of vacuum at idle in neutral and it seemed to work fine.

IMG_1760.JPG


This car though....
I need to test the vacuum in gear but at idle, it was over 16" in neutral when I tested it yesterday. The cam is not rowdy! The car does not have a heavy lope at all. The engine has under 200 miles on it even though I built it in 2020.
Still, the brake pedal is super firm and has very little travel. If I'm in gear trying to stop, the pedal feels like there is no boost happening at all. If I pop it into neutral and hit the brakes, they feel better and the car stops easier. I take this to mean that the booster just isn't getting enough vacuum to function. I did a "test suck" on the vacuum fitting check valve and it works fine.
How about trying another booster?

IMG_1811[1].JPG


Booster number 2 and the pedal feel is actually worse. Both boosters seem to be working as well as they should, neither "hiss" like a failing one often does. I am looking at returning to the manual setup with the same 15/16" master cylinder that I had before OR the aluminum 1.03" Force 10 unit.
My gripe about the manual brakes before was pedal travel and feel.
Hey...all of this stuff is already here, I'm spending no money on these experiments but I'd hope that with all of this stuff, I'd learn something.
Either I have 2 bad boosters in a row which seems unlikely since the first booster worked fine in the other car.
That leaves insufficient vacuum as the reason for the boosters not performing.
What else should I be looking for? It isn't as if the booster pushrod is recessed, giving too much pedal travel before engaging the brakes.
I had the same version of this cam in the first 440 that I had in this car in 2001. It had enough vacuum to stop the car then. Can the 57 cubic inches of difference between the 383 and 440 make that much of a difference?
I have 2 or 3 more of these A body boosters to try OR I could just admit failure and put the manual master cylinder back in.
I'm not sure what I'll do yet.
 
I used to check the boosters by turning the engine off, waiting 20-30 seconds, then pull the check valve out of the booster. If it still had vacuum, it was good. If not, either the check valve or the booster was bad.
Also when letting off the throttle and decelerating, even a lopey cammed engine will produce adequate vacuum for power brakes, it's just a matter of charging/storing it in the booster reservoir. The early cars used a large (3/4"?) vacuum line and a remote secondary reservoir.
 
I got this reading before I adjusted the air/fuel idle mixture screws.

IMG_1746.JPG


Afterwards, I got a reading of 16-17.
This is my last attempt at making these old boosters work.

IMG_1815.jpeg

IMG_1816.jpeg
IMG_1817.jpeg


Number three is in.

IMG_1818.jpeg


IMG_1819.jpeg


Whifffff !!!
Three swings and three misses. I’m obviously missing something. All three bolted up fine, the first one responded better when braking in neutral vs in gear. The second one felt as if no boost was occurring at all. This third one is about like the second one. I’ve been told that when pressing the brake pedal and starting the car, the pedal should drop slightly once the engine starts. This happened with none of these boosters. If I shut it down and wait a few moments then pull the line from the booster, it makes a pfffffft sound indicating that it was holding vacuum in the booster.
To me, that sure seems like the boosters were holding vacuum, just not providing boost. That seems really strange to me.
I drove around out back with #3 in place and I might as well have no vacuum line attached. Hard pedal and no assist at all. Yeah, all three boosters were old, original and well seasoned but they were not leaking. I sprayed ether and brake cleaner all over #3 and the engine never raced or stumbled. The brakes do engage at a point in the pedal travel that is correct, it just takes a lot of foot pressure to stop. For a moment I thought that the booster pushrod needed to be adjusted out but that only affects the point where the master cylinder starts to move fluid. Adjusted in too much, you’ll have slack and the brakes won’t react until the pedal is toward the floor. If it is adjusted out too much, it acts like a preload and the brakes engage and don’t release.
I’m in the sweet spot but without proper boost.
 
Last edited:
Back to basics.

IMG_1820.jpeg


This is actually a 1.0 inch bore unit, I had it on the shelf and was using it with the three boosters that I tried. It always stopped the car and the pedal was firm so I figured it would be fine. I decided to try it to see if I could skip the process of bleeding the system when switching master cylinders and brake lines. These were longer, made to fit the boosted combination. There is enough space to put some bends in them to just keep them in place. They don’t look “finish quality” but they work and don’t leak. How does it stop ?

IMG_1821.jpeg


The first manual master cylinder was a later design aluminum and plastic 15/16” unit from Doctor Diff.
I don’t know if the brakes feel so good now in comparison to the crappy UNboosted power brakes but I like it now. I’m wondering if they were like this before if I would have even bothered to try the power. In the future I will probably upgrade to the OEM style 1966-70 B body booster.
I’ve often thought that a front disc, rear drum, manual master cylinder is a great setup in an A body. This car weighs around 3700 lbs as is but does have 12” front discs. If/when I dig into this 383 to make more power, I’ll need to stop it too.
Cheers.
 
I kind of like the idea of a NASCAR theme for the car. I ran pictures of my red car through an AI Program and it came up with some interesting renderings.
The vintage NASCAR Mopars seemed to all run a wide 15” wheel. Years ago, a guy gave me a set of modified wheels he had done at Stockton Wheel. His Valiant had the leaf springs moved inboard to run bigger tires.
This is a 16x10 wheel and a 295-50-16.

IMG_1823.jpeg


It measures 28 1/2” which I think looks about the limit for the wheel opening.

IMG_1824.jpeg

I like the look but these wheels have WAY too much backspacing.

IMG_1830.jpeg


Yeah. 6 1/4” is a lot! The odd thing is, these wheels were in a Valiant with a mild 360 that maybe turned a low 14. Why go through all this effort??
Even with a 3/8 spacer…..

IMG_1828.jpeg


IMG_1825.jpeg


The sidewall touches the springs.

IMG_1826.jpeg


It almost rubs the inner wheel tub too.

IMG_1827.jpeg


I have a pair of 16x7 front wheels too. No tires on those. I like the look of a wide steel wheel for the NASCAR vibe and would like to use these.

IMG_1829.jpeg


Unfortunately, these rear wheels are just too weird. If I were a kid, I would use these:

IMG_1834.jpeg


These used to have wheel studs that I knocked out. I did use these in 2001 for a short time. I had 3” wheel studs in the axle shafts and open end lug nuts.

IMG_1835.jpeg


That hack would still work today but I think I should get wheels with a better fit rather than doing BS stuff to make wrong wheels fit. Looking at the fitment, it looks like 5” or more back spacing is getting too close to the springs and wheel tub. This was 6 1/4” minus the thin 3/8” spacer, 5 7/8” net. This is a stock width 68-70 B body 8 3/4” housing.
 
Auto Transport Service
Back
Top