• When you click on links to various merchants on this site and make a purchase, this can result in this site earning a commission. Affiliate programs and affiliations include, but are not limited to, the eBay Partner Network.

1967 Coronet Deluxe

Ok so today was the first time in quite a few weeks I got started on the 67 again. Not a ton of progress to show here but a big step toward getting the engine bay ready for its new furniture.

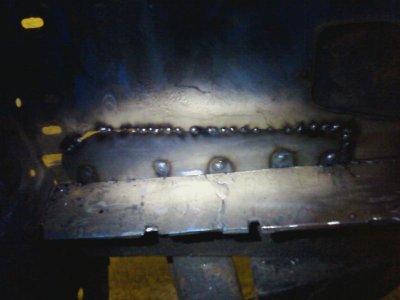
Excuse the crappy phone photos. I still have to grind down the welds and prime the spots and I have another spot on the passenger side toward the bottom to fix but shouldn't take too long.

0415120948a.jpg

0415120949.jpg

0415120948.jpg

0415120949a.jpg

0415121102.jpg

0415121102a.jpg
 
Well I have been busting butt since Friday afternoon working on getting the NV-3500 5 speed put where its going to go. I decided to mount the trans first so I could do my best not to have to cut up the floor/tunnel. Which I lucked out. I did make a couple tiny notches in the trans ribs but not much. The floor I was able to leave alone. Also with the length of the Hemi I still have 9" from the balancer to the core support. Plenty for the radiator and fan. (of course that was by measurement as that will be another weekend.) I really like the shifter location except I may shorten the shaft a little bit. It comes up almost exactly where the 4 speed would have come which I figure is a sign from Ma Mopar. Keep posted, the 5.7 meets its home next. (if I get time since the honey do list includes remodeling the kitchen)

0420122212.jpg

0420122218.jpg

0420122218a.jpg

0420122228.jpg

0421121649.jpg

0421122014a.jpg

0421122023.jpg

0421122036.jpg

0421122111a.jpg

0421122112.jpg
 

Attachments

  • 0418121943.jpg
    0418121943.jpg
    34.2 KB · Views: 856
"Keep posted, the 5.7 meets its home next." YEP! You do some good work making these panels and welding, Are you leaving the HEMI in or is this a test to make sure everythings right? Looking good, you sure have made a lot of progress.. Good luck to you..
 
"Keep posted, the 5.7 meets its home next." YEP! You do some good work making these panels and welding, Are you leaving the HEMI in or is this a test to make sure everythings right? Looking good, you sure have made a lot of progress.. Good luck to you..

Thanks Ron. The 5.7 will get pulled back out. I want to get it in its home and then put in the brake booster/master and clutch master/slave. Once I get that all figured out I will weld up any holes I don't need and take it all apart for paint. I figure no point in putting an engine in an engine bay that hasn't been properly detailed. The engine and trans will also get a coat of paint to keep things looking good.

I'm considering either a nice metallic grey for the engine or maybe hemi orange with a black finish on the valve covers like that of the 426. but that is still open for discussion.
 
I started making my motor mount plates last night for getting this thing installed. I had planned to do the installation this weekend but it looks like that will be cut short as I am going to attend a local show/swap meet to unload a pile of stuff I don't need. It was nice to work on the car again as opposed to the house although only for an hour or so.

I think I may modify the oil pan before I install the engine so hopefully I can do most of that this weekend.
 
I started modifying the oil pan the last couple days after the swap meet. The swap meet was a bit of a bust but still kinda fun and got to see some real nice cars.

I will post an excessive amount of photos for this part for anybody not wanting to pay $200+ for a mid sump pan.

Details:
I sliced the pan all the way around except the front about (guess I used a square for a guide but didnt measure)1.25 inches above the pan rail to separate the sump from the rail. I then moved it forward until the ribs lined up. This is as far as you can go if you want to use the stock dipstick location and in my case is not far enough. I will have to cut the back area off the sump and make it flat to make sure I have enough room for steering clearance.

Be prepared to spend some time with a body hammer to get things to line up this way...they don't on their own.
0518122151b.jpg

0518122151.jpg

0518122151a.jpg

0521122022a.jpg

0521122022.jpg

0521122022b.jpg

0521122039.jpg
 
Nice job, seems you are'nt afraid of any sort of metal work.
 
Nice job, seems you are'nt afraid of any sort of metal work.

Well the way I look at it is I am not out anything trying it. If I get it accomplished this way I save $275. If I fail I spend that $275. The truck pan is worthless for me in stock form and not worth trying to sell so this will help save some money.

Also for me and my budget I really just don't have a choice.:icon_cry:
 
Well this weekend I was very productive. So much so that I ran out of welding gas and am stuck on a holiday weekend with no way to get more. Oh well I guess I am forced to relax.

But what I did get done was a huge step. I finished up the oil pan with the exception of the drain bolt and pick up tube. But I got it sealed up so I could accomplish the second goal which was to mate the Hemi with the Coronet. Albeit a brief courtship they seemed to enjoy each other's company. I got the motor mounts tacked together and started gusseting the k-frame side when I ran out of gas. So yes they are not done and not strong enough yet but still aint goin no where.

So yes I pulled the engine back out and will put it back in another 2 times before this is all done with.

0525121831.jpg

0525121831a.jpg

0525121831b.jpg

0525121831c.jpg

0525121944.jpg

0527120812.jpg

0527120824.jpg

0527120833.jpg

0527120858.jpg

0527120859.jpg

0527121032.jpg

0527121419.jpg

0527121419a.jpg
 
To look at the picture of the Hemi in the car, It doesn't appear the exhaust headers will be a problem.. But with the work you do and your fab skills, i imagine it wouldn't be a problem anyway.. This really is inspiring to follow along. You have nearly 3500 views on your build.. Continued good luck!
 
Well the engine is back in the car for a while now. From here I will move to the rust again and then mock in my brake booster and finish prepping the firewall for final paint before I can make it a permanent installation. So for those following along here are some pics of its final location.

Everything fits well as previously mentioned and the oil filter works just fine, no need for a relocation. (I still gotta go turn the wheels in both directions to check oil pan clearance but i think its ok.)

100_7005.jpg

100_7006.jpg

100_7007.jpg

100_7008.jpg

100_7009.jpg

100_7010.jpg

100_7011.jpg

0601121948.jpg

0601121948a.jpg

0601121956.jpg

0601122001a.jpg
 
I do see the oil filter fitting to the block, but have you tried to spin it off, cause it doesn't look like it will come off with the k frame being soooo close, or is this an illusion of the pics? I like the engine and trans mounts, very nice!!!
 
I do see the oil filter fitting to the block, but have you tried to spin it off, cause it doesn't look like it will come off with the k frame being soooo close, or is this an illusion of the pics? I like the engine and trans mounts, very nice!!!


Yes it spins off easily, just an illusion. I actually took it off to put in the bolt and then put it back on after.

Awesome Work!

Thanks...long way to go!
 
Sweet Kevin, your doing your homework!!
 
Thanks, took some serious time playing around with it when I mocked it in place the first time to make sure it was all going to work out...had it not I would have re-worked the floor and moved the whole package. (not that I wanted to do that)

Next up will be the trunk and rear quarter rust I have...once the rust is all gone then I can just focus on making it all work.
 
I got started on the trunk rust today. Pulled the rear axle, cut out most of the rust in the trunk and am just about ready to start drilling spot welds to pull out the bad sections of frame rail back there. Also finished once and for all stripping the 66. Jeff and Jerry (Dodge33) stopped by and dropped off the trunk lid I was looking for...great guys and thanks again!! Anybody needing parts send them a PM, you can't go wrong.

0611121816.jpg

0611121920.jpg

0612121914.jpg

0612121914a.jpg

0612121934.jpg

0612121934a.jpg

0612121934b.jpg

0612121934c.jpg
 
Well i spent some time priming and cutting out more damaged metal. Now I have to figure out what I am going to do with the trunk extension.

100_7039.jpg

100_7031.jpg

100_7027.jpg

100_7025.jpg

100_7041.jpg

100_7045.jpg
 
I got the frame rails back in today as well as the 7 1/4 out of the 66 to keep the car a roller while I rebuild the 8 3/4. Its nice to see the car back on an axle again and in the garage. Its also nice that the rear suspension isnt as stiff with these springs. I think I'll use the 66' springs for the complete install later.

100_7051.JPG

100_7052.JPG

100_7049.JPG

100_7050.JPG

100_7053.JPG
 
Wow Kb! i just read thru your whole thread, and have come a long *** way!! keep up the great work, and she'll be rumbling along in no time!!
 
Auto Transport Service
Back
Top