Looks good so far I will be tagging along
You are using an out of date browser. It may not display this or other websites correctly.
You should upgrade or use an alternative browser.
You should upgrade or use an alternative browser.
71 Road Runner Restoration Started
- Thread starter 71airgrabberRR
- Start date
71airgrabberRR
Well-Known Member
4 Speed Parts / Pictures


Hello again !!!
Here are a few pictures of some parts I have that will work in the RR. I rebuilt the shifter mechanism about 2 years ago. You can still get the parts for them. The shifter I have is actually for a 1970 E-body Challenger / 'Cuda and it has a push in style shifter handle. In 71 Chrysler changed the design and went to what we now see all the time..... 2 bolts that hold the handle in position.
I may end up keeping the shifter for my 70 Challenger, and start looking for a later model one.
The bell housing I picked up a few years ago at the swap meet show "Mopars with Big Daddy" near Ocala, FL. I cleaned / degreased it then glass beaded it and checked all of the thread holes. After that I sprayed it with cast aluminum. The final touch was the Chrysler Hemi Orange.
I recently purchased a new clutch fork for the Challenger. I will have to check it against this one to make sure it's the right length.
Finally, the 2 four speeds pictured are freshly rebuilt 23 spline units. They have the dual bolt pattern for both "B" and "E" body cars.
I replaced all of the synchronizers, snap rings, seals, bearings and set the end play. Then I get new shifter forks from a later model transmission and use them. The late model forks are steel, where the earlier ones were brass. You have to modify them so they will work, by machining down the small protrusion on the end so that they will fit inside the side case.
I always use the steel forks now because they are a lot harder to break when you're slamming gears ....... Don't ask how I found that out...... :angryfire: All I'll say is that it sucked having to limp the car home in 3rd.... Luckily I had a set of 4.30's in the rear !!!!
Stand by !!!!! More to follow............
71airgrabberRR
Well-Known Member
Six Barrel Carbs / Intake / Engine parts


These pictures are of the new carbs that Holley offers, along with some engine parts for the RR. The new carbs look like the originals with the exception of the fuel bowl screws. The new ones don't have the flat screw driver head like the originals did. I purchased a set of replacement screws to make them "look" original.
The intake is a new Edelbrock offering. Once it's sitting on top of the 440 source heads I will paint everything Hemi Orange. No one will know the difference because I may end up grinding of the Edelbrock name.
Chrysler offers a six pack installation kit that has the coil bracket, fuel lines, throttle cable and bracket, return springs and throttle linkage all in one box.
It is part #P4529059 and has everything you need. They are available for both small and big block applications.
Then I have a windage tray and an "Old School" 292 Comp Cams cam kit. It comes complete with Timing Chain, Valve Stem Seals, Retainers and Locks, Valve Springs, Lifters and Cam. The beauty of this kit is that everything is perfectly matched to work together. You don't have to worry about coil bind and seat pressures, etc.
.501 lift, 292 degrees and 110 center line. I know there are a lot of cams out there, and that the mopar cams have wider lobes, but I've used this set up before and it works. I'm not building a rocket ship, but I want the car to have a nice choppy sound at idle and still make respectable power.
- - - Updated - - -


Here is a part that I located for the RR a few days ago. My car was missing this part. I glass beaded the back side then clear coated it to keep it from rusting away. I only gave the black part a quick wipe down for now. It will get nicely detailed later in the restoration. Right now my mission is to try and preserve the car from any further deterioration, along with locating missing parts.
Look close and you can see the very rare driver side floor freeway ventilation system....... You can use the torsion bar as a foot rest too...... Works great for those with a heavy right foot.:laughing1:
The part fit perfectly and came off a Dodge. I plan on getting a new RR center emblem for it later.
- - - Updated - - -


I was lucky and found a decent fender locally for the RR. This one has a small bit of rust at the lower bottom corner where they all rust at. You can see the rusted area in the second picture. AMD makes a patch panel for this spot. Once the fender has been blasted I will know if I need the patch or not.
The area of the fender that is in between the front side marker light, and bumper area has a small dent. It was previously repaired and you can see this old repair in the 3rd picture. I will work this area out using a stud welder until it takes only a small amount of filler. Pictures will be taken and posted along the way showing the process.....
Overall this is a very useable part. (and it's a lot better than the one on the car now ..... )
Stay Tuned !!!!!:3gears:
- - - Updated - - -


These pictures show the new replacement dash bezel with the original gauges. The last 3 show the SWEET front lower valance that I scored from a fellow FBBO member. It's original and straight as an arrow. I has been repainted once, but I'm taking it down to bare metal.
These pictures are of the new carbs that Holley offers, along with some engine parts for the RR. The new carbs look like the originals with the exception of the fuel bowl screws. The new ones don't have the flat screw driver head like the originals did. I purchased a set of replacement screws to make them "look" original.
The intake is a new Edelbrock offering. Once it's sitting on top of the 440 source heads I will paint everything Hemi Orange. No one will know the difference because I may end up grinding of the Edelbrock name.
Chrysler offers a six pack installation kit that has the coil bracket, fuel lines, throttle cable and bracket, return springs and throttle linkage all in one box.
It is part #P4529059 and has everything you need. They are available for both small and big block applications.
Then I have a windage tray and an "Old School" 292 Comp Cams cam kit. It comes complete with Timing Chain, Valve Stem Seals, Retainers and Locks, Valve Springs, Lifters and Cam. The beauty of this kit is that everything is perfectly matched to work together. You don't have to worry about coil bind and seat pressures, etc.
.501 lift, 292 degrees and 110 center line. I know there are a lot of cams out there, and that the mopar cams have wider lobes, but I've used this set up before and it works. I'm not building a rocket ship, but I want the car to have a nice choppy sound at idle and still make respectable power.
- - - Updated - - -
Here is a part that I located for the RR a few days ago. My car was missing this part. I glass beaded the back side then clear coated it to keep it from rusting away. I only gave the black part a quick wipe down for now. It will get nicely detailed later in the restoration. Right now my mission is to try and preserve the car from any further deterioration, along with locating missing parts.
Look close and you can see the very rare driver side floor freeway ventilation system....... You can use the torsion bar as a foot rest too...... Works great for those with a heavy right foot.:laughing1:
The part fit perfectly and came off a Dodge. I plan on getting a new RR center emblem for it later.
- - - Updated - - -
I was lucky and found a decent fender locally for the RR. This one has a small bit of rust at the lower bottom corner where they all rust at. You can see the rusted area in the second picture. AMD makes a patch panel for this spot. Once the fender has been blasted I will know if I need the patch or not.
The area of the fender that is in between the front side marker light, and bumper area has a small dent. It was previously repaired and you can see this old repair in the 3rd picture. I will work this area out using a stud welder until it takes only a small amount of filler. Pictures will be taken and posted along the way showing the process.....
Overall this is a very useable part. (and it's a lot better than the one on the car now ..... )
Stay Tuned !!!!!:3gears:
- - - Updated - - -
These pictures show the new replacement dash bezel with the original gauges. The last 3 show the SWEET front lower valance that I scored from a fellow FBBO member. It's original and straight as an arrow. I has been repainted once, but I'm taking it down to bare metal.
Last edited:
- Local time
- 4:12 AM
- Joined
- Jan 1, 2013
- Messages
- 8,038
- Reaction score
- 3,467
- Location
- Mascoutah, Illinois
Man I love your updates .. It's like christmas every time I open this thread .. it just keeps on giving
Keep it up brother")
Keep it up brother
71airgrabberRR
Well-Known Member
Man I love your updates .. It's like christmas every time I open this thread .. it just keeps on giving
Keep it up brother
Will do !!! I have one more set of pictures, and then I have to go to bed......... 0530 comes way too fast !!!!
- - - Updated - - -


This last set of photos show the rear fold down license plate bracket, front head light buckets, and front license plate bracket. My car was missing the rear license bracket, and luckily I found one on EBay that was pretty nice... It's in pretty good shape, so I'll set it aside for now.
Next you see the head light buckets. The originals on my car have some rust on them and these are better than what I have. Soon I'll post a little before and after shots with the buckets showing how I restore them.
The last 2 pictures show the front license plate bracket. I found this part lying inside the trunk of the car after I brought it home. It was pretty badly surface rusted. I sand blasted it and them painted it black to preserve it for now. If you look close you can see the rust pit marks. I can fill those in and the part will look brand new when it's done. The rust has been killed, and the metal is still intact.
That's all Folks !!!!
Stay tuned for more regular updates......
Good night.
71airgrabberRR
Well-Known Member
Latest Progress Photos
Sorry that nothing has been posted lately. I have been very sick. Started as a sinus infection and ended up in my chest. They gave me several breathing treatments and an injection to open me up so I could breathe a little. I have been in bed every since. This is my first time out of bed, and I still feel like crap. (but I'm getting better)
I didn't want to leave you all hanging so I found a few more pictures I took a while ago of the car. I believe the were taken around the end of May.

These two pictures show the original bench seat and the condition of the dash. Previously I had removed the door panels to gain access to the door internal parts. I tried to get the windows to roll up and down a little better, and I wanted to see how bad these original doors were. The passenger side door had a pretty nasty dent, but luckily I was able to pop most of it out. The dent was about 6 inches deep.
I still plan on using the doors from the SSB parts car. They are much better. These original doors are useable with some work. But I want to make her as nice as possible.

The last photo shows the door prior to working on the dent. The second to last shows the end result.
Sorry that nothing has been posted lately. I have been very sick. Started as a sinus infection and ended up in my chest. They gave me several breathing treatments and an injection to open me up so I could breathe a little. I have been in bed every since. This is my first time out of bed, and I still feel like crap. (but I'm getting better)
I didn't want to leave you all hanging so I found a few more pictures I took a while ago of the car. I believe the were taken around the end of May.
These two pictures show the original bench seat and the condition of the dash. Previously I had removed the door panels to gain access to the door internal parts. I tried to get the windows to roll up and down a little better, and I wanted to see how bad these original doors were. The passenger side door had a pretty nasty dent, but luckily I was able to pop most of it out. The dent was about 6 inches deep.
I still plan on using the doors from the SSB parts car. They are much better. These original doors are useable with some work. But I want to make her as nice as possible.
The last photo shows the door prior to working on the dent. The second to last shows the end result.
71airgrabberRR
Well-Known Member
Interior Removal Started

 Here are a few more pictures that show the interior of the car after the carpet and seats were removed. These pictures were taken around the end of May. I have been too sick to work on anything. I didn't want to let the thread slip away, and I wanted to keep you all posted with progress, even if it's a little old. These photos show the condition of the floor pan. As you can see there is a large hole where the driver would rest their feet. The passenger side looks to be fairly intact, but the truth will come out after blasting.


This set of pictures show what the rear floor pan condition is like. Remarkably solid, but again, it has not been blasted yet. The floors in my Duster looked similar to this, but ended up having a few small pin holes after everything was cleaned and blasted.
- - - Updated - - -
Here are a few pictures showing the condition of the inner roof structure. Again, these photos were taken around the end of May.

 I left the sail panels in place and re-installed the head liner bows after removing the fabric and jute backing from the car.
If you ever decide to try and replace the head liner in your car it's not all that hard to do. One very important thing to keep in mind is this:
Always keep the bows in correct order. Number them or tag them as you take them out, so they can be reinstalled in the same position later. You will not be very happy when it comes time to install your headliner if you don't. Very Important.
- - - Updated - - -
These few photos that were taken at the end of May, show the condition of the trunk floor after everything was removed and it was vacuumed out. I am very happy with what we found. So far the car is starting to look even better than I originally expected. I don't want to get my hopes up too quickly though. The final truth will show after it has been blasted.


I hope I start feeling better soon so that I can get back out in the shop. The trunk lid has some rust along the lower edge. It can be fixed, but I will probably end up using the one from the 72 SSB instead. It is rust free and only has a very small crease to contend with.


I will cut out the openings for the "Go-Wing" spoiler that will be installed on the car later. These pictures show the original openings that I can use as a template.
That's all for tonight. I'm going back to bed. Being sick sucks !!!!!
Here are a few more pictures that show the interior of the car after the carpet and seats were removed. These pictures were taken around the end of May. I have been too sick to work on anything. I didn't want to let the thread slip away, and I wanted to keep you all posted with progress, even if it's a little old. These photos show the condition of the floor pan. As you can see there is a large hole where the driver would rest their feet. The passenger side looks to be fairly intact, but the truth will come out after blasting.This set of pictures show what the rear floor pan condition is like. Remarkably solid, but again, it has not been blasted yet. The floors in my Duster looked similar to this, but ended up having a few small pin holes after everything was cleaned and blasted.
- - - Updated - - -
Here are a few pictures showing the condition of the inner roof structure. Again, these photos were taken around the end of May.
I left the sail panels in place and re-installed the head liner bows after removing the fabric and jute backing from the car.If you ever decide to try and replace the head liner in your car it's not all that hard to do. One very important thing to keep in mind is this:
Always keep the bows in correct order. Number them or tag them as you take them out, so they can be reinstalled in the same position later. You will not be very happy when it comes time to install your headliner if you don't. Very Important.
- - - Updated - - -
These few photos that were taken at the end of May, show the condition of the trunk floor after everything was removed and it was vacuumed out. I am very happy with what we found. So far the car is starting to look even better than I originally expected. I don't want to get my hopes up too quickly though. The final truth will show after it has been blasted.
I hope I start feeling better soon so that I can get back out in the shop. The trunk lid has some rust along the lower edge. It can be fixed, but I will probably end up using the one from the 72 SSB instead. It is rust free and only has a very small crease to contend with.
I will cut out the openings for the "Go-Wing" spoiler that will be installed on the car later. These pictures show the original openings that I can use as a template.
That's all for tonight. I'm going back to bed. Being sick sucks !!!!!
71airgrabberRR
Well-Known Member
Sorry, I'm still pretty sick
It seems like I have been fighting this crap for a long while now. Too Long......:sad4:
All I have been doing is trying to sleep. Hard to do when you can't breathe.
Nothing new to report with progress on the car.
I promise as soon as I get better more to follow.
View attachment 122316View attachment 122317Here are a few more pictures that show the interior of the car after the carpet and seats were removed. These pictures were taken around the end of May. I have been too sick to work on anything. I didn't want to let the thread slip away, and I wanted to keep you all posted with progress, even if it's a little old. These photos show the condition of the floor pan. As you can see there is a large hole where the driver would rest their feet. The passenger side looks to be fairly intact, but the truth will come out after blasting.
View attachment 122318View attachment 122319View attachment 122320
This set of pictures show what the rear floor pan condition is like. Remarkably solid, but again, it has not been blasted yet. The floors in my Duster looked similar to this, but ended up having a few small pin holes after everything was cleaned and blasted.
- - - Updated - - -
Here are a few pictures showing the condition of the inner roof structure. Again, these photos were taken around the end of May.View attachment 122330View attachment 122331View attachment 122332 I left the sail panels in place and re-installed the head liner bows after removing the fabric and jute backing from the car.
If you ever decide to try and replace the head liner in your car it's not all that hard to do. One very important thing to keep in mind is this:
Always keep the bows in correct order. Number them or tag them as you take them out, so they can be reinstalled in the same position later. You will not be very happy when it comes time to install your headliner if you don't. Very Important.
- - - Updated - - -
These few photos that were taken at the end of May, show the condition of the trunk floor after everything was removed and it was vacuumed out. I am very happy with what we found. So far the car is starting to look even better than I originally expected. I don't want to get my hopes up too quickly though. The final truth will show after it has been blasted.
View attachment 122333View attachment 122334View attachment 122335View attachment 122336
I hope I start feeling better soon so that I can get back out in the shop. The trunk lid has some rust along the lower edge. It can be fixed, but I will probably end up using the one from the 72 SSB instead. It is rust free and only has a very small crease to contend with.
View attachment 122337View attachment 122338
I will cut out the openings for the "Go-Wing" spoiler that will be installed on the car later. These pictures show the original openings that I can use as a template.
That's all for tonight. I'm going back to bed. Being sick sucks !!!!!
It seems like I have been fighting this crap for a long while now. Too Long......:sad4:
All I have been doing is trying to sleep. Hard to do when you can't breathe.
Nothing new to report with progress on the car.
I promise as soon as I get better more to follow.
Hey, nice project you have there! I really like '71 Road Runners - I'll be following your progress. Great work, keep it up!
X-2 Great project, Get to feeling better!!!
roadrunnerman
Well-Known Member
The car has waited this long. It can wait till you're feeling better and then you can go at it 100 %
71airgrabberRR
Well-Known Member
Feeling better now !!!
Hello everyone. Today is my first day back at work since I became ill. I appreciate everyone's get well wishes. I still have a few more follow up visits with the doc though.
Good news is I scored a decent 4 speed pedal assembly for the bird. I will start working on the car along with taking some more pictures for you all. First I have about 2 weeks of catch up to do.
Take care and stay tuned!!!!
- Local time
- 4:12 AM
- Joined
- Jan 1, 2013
- Messages
- 8,038
- Reaction score
- 3,467
- Location
- Mascoutah, Illinois
Glad you are better now and back at it. Looking forward to more progress pics
71airgrabberRR
Well-Known Member


4-Speed eh! Woo woo, Sounds like real fun coming! Good to see you back and feeling better..
71airgrabberRR
Well-Known Member
Thanks Brother, That makes 2 of us !!! I'm still not 100%, but WAY far better than I was. Went back to the doc today. Another breathing treatment and 10 more days of pills....
Today was the first day I walked into the shop since this illness started. Missed the place. Didn't do much, just looked around a little and took these pics.
Today was the first day I walked into the shop since this illness started. Missed the place. Didn't do much, just looked around a little and took these pics.
- Local time
- 4:12 AM
- Joined
- Jan 1, 2013
- Messages
- 8,038
- Reaction score
- 3,467
- Location
- Mascoutah, Illinois
Good for you .. take it easy. Full recovery soon expected I hope
71airgrabberRR
Well-Known Member
Visited my friend's body shop

Yesterday I stopped by my friend and fellow Mopar enthusiast to see if he had any new projects started. He did so I snapped a few photos for you all.
I know these pictures are not from my car. (But they all are B body cars)
- - - Updated - - -
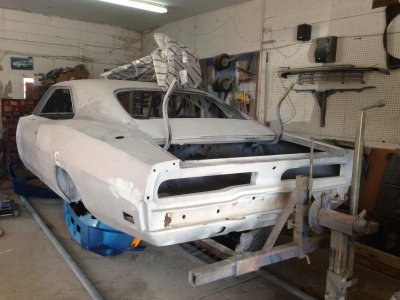
Here is another car. This one is a V code 4 speed. The first 2 pics were of a 69 Charger 500. Check out the back window.
- - - Updated - - -
 This picture is a 68 Coronet / Super Bee. All of these cars have pretty nice bodies. They are in very capable hands. My friend is a very reputable restoration specialist. He has had a lot of customer cars take trophies at Nationwide events. A few of the cars he has done have rolled across the auction block at Barrett Jackson.
When I get into a hard spot he is my "go to" guy. I know a lot about our Mopar cars, but IMHO he is a master!!!
- - - Updated - - -
I will get back to my normal presentation now. I thought you all would like these photos. Each day I feel better but I don't want to overdo things too quickly.
You all take care and stay safe.
stay tuned for more of my Road Runner saga......
- - - Updated - - -
OK these pictures are not in order, sorry I'm posting from my phone.
The top photo is the 69 Charger 500, followed by the blue 68 Super Bee.
Third is another picture of the 69 Charger 500 that shows off the back window.
The last picture is a 1970 GTX V code 4 speed car. It has the gray primer driver side and black primer air grabber hood.
sorry for any confusion..........
Yesterday I stopped by my friend and fellow Mopar enthusiast to see if he had any new projects started. He did so I snapped a few photos for you all.
I know these pictures are not from my car. (But they all are B body cars)
- - - Updated - - -
Here is another car. This one is a V code 4 speed. The first 2 pics were of a 69 Charger 500. Check out the back window.
- - - Updated - - -
This picture is a 68 Coronet / Super Bee. All of these cars have pretty nice bodies. They are in very capable hands. My friend is a very reputable restoration specialist. He has had a lot of customer cars take trophies at Nationwide events. A few of the cars he has done have rolled across the auction block at Barrett Jackson.When I get into a hard spot he is my "go to" guy. I know a lot about our Mopar cars, but IMHO he is a master!!!
- - - Updated - - -
I will get back to my normal presentation now. I thought you all would like these photos. Each day I feel better but I don't want to overdo things too quickly.
You all take care and stay safe.
stay tuned for more of my Road Runner saga......
- - - Updated - - -
OK these pictures are not in order, sorry I'm posting from my phone.
The top photo is the 69 Charger 500, followed by the blue 68 Super Bee.
Third is another picture of the 69 Charger 500 that shows off the back window.
The last picture is a 1970 GTX V code 4 speed car. It has the gray primer driver side and black primer air grabber hood.
sorry for any confusion..........
Attachments

- Local time
- 2:12 AM
- Joined
- Jan 16, 2011
- Messages
- 78,712
- Reaction score
- 126,864
- Location
- NorCal Sierras
your buddy has a cool shop too...
- - - Updated - - -
lots of new parts good luck....
- - - Updated - - -
lots of new parts good luck....
rog_allen
Well-Known Member

Similar threads
- Replies
- 4
- Views
- 490
- Replies
- 1
- Views
- 3K
- Replies
- 26
- Views
- 3K


