• When you click on links to various merchants on this site and make a purchase, this can result in this site earning a commission. Affiliate programs and affiliations include, but are not limited to, the eBay Partner Network.

For the Love for my Father, My 69 GTX Restoration

Status
Not open for further replies.
Justin- Nice work. What's the significance of the red and green paint on the axle ends? Did they do that in the factory to easily distinguish left from right? - Abe
Abe

Thanks for the compliment!

Only on Dana's the axles are different lengths and the colors mainly insured designation for proper assembly of the axles and for the (L) and (R) hand lugs to the axles...

Front hubs got the same colors and that was so the green (R) hand lug hub was on the passenger side and the red (L) hand lug hub got on the driver side

Justin
 
Make that a $13.50 fix, Ouch!.....Keep in mind 50% came off easily but the other half the top layer tore of and a finger nail and some time came into play...Cannot use any remover ect because I do not want to remove paint or show it was meddled with....

With some time it was tediously removed....The easy part was the replacement...


I have found that WD40 is good product to remove decals. Once it saturates through the paper, it starts softening the glue.
 
I have found that WD40 is good product to remove decals. Once it saturates through the paper, it starts softening the glue.
One nice feature of this build thread is the "true" hobbyists and members following this build thread....From time to time during the course of this thread members have pointed things out openly here and behind the scenes. Either mistakes I made, parts questions in relation to build date/pn, and pointers to make life easier....

The wd40 thing Mark pointed out is a great tool and I completely forgot about that....However, I won't now and that would have made a big time savings yesterday!

Thanks Mark....You da man bro....


I have said this before. iI one is not here for the right reasons, Please Leave! This build is built with pure love for a wonderful Father that I cannot get back in this life....Coming here and muddying up this thread is blatantly disrespecting a Vietnam Vet and a wonderful father....

Those people are welcome to PM me anytime....This thread is not open territory and the creator is the "owner" and the Mods will regulate as necessary!

Justin
 
Last edited:
Since I inspected the rears yesterday.....I decided to check the front this AM....Glad I did because when I removed the passenger side I notice I left tape on the shoes surfaces. 2" wide tape by 6" designating the "right" side shoes and "primary" shoe to ease installation at the time...Lol...would have made for an interesting stop....It happens but was caught well before drive time:p

The ole Boeshield is keeping thing rust free...The yellow on the upper control arm is a light coat of cosmoline...

Since I had the front lifted. I decided to break the heads off the breakaway zerk fittings. If they ever need to be greased you simply remove and replace with a new fitting, grease and then replace....

IMG_1614.JPG
IMG_1615.JPG
IMG_1617.JPG
 
Looking great Justin. Just out of curiosity, why did they break the heads off the zerk fittings?
 
Looking great Justin. Just out of curiosity, why did they break the heads off the zerk fittings?
Roger

Thanks! They did that to ensure the car would get properly serviced at the dealer when the owner took it in for maintenance..The dealer was supposed to replace the fittings and then grease the joints..

Justin
 
Question on the roof rail weather strip, Is yours glued at the leading edge or is there a metal plate inbedded and you use screws to fasten? My '62 was glued and all of the aftermarket ones have a plate inside. You have to shape the end to fit the contour and then use glue to attach. Just curious to what you have.
Kid

To answer your question...68-70 does not have a metal plate in the end and the weatherstrip end is glue to the door frame. I use the black weatherstrip adhesive and let it setup properly and then attach. I use a paper towel bunched into a ball and the tape hold in place to shut the door to apply pressure. The last pics show this...


So the first few pics are comparing the original to the reproduction. The reproduction is the one nearest to you in the photograph. Big differences all the way around. The biggest and most important difference is the channel for the 1/4 glass. Reproduction has zero channel ##see pics##..

Most people slap these in but there is a slight process and takes a little finger work. I set the notched area and corner by the A pillar first and then work it into place. The inside groove starts first and then the outside. Then walk that along every inch or so. This will ensure the lip that laps over mates with the inside trim properly. Once you get it going it is easy to do....

IMG_1618.JPG
IMG_1619.JPG
IMG_1620.JPG
IMG_1621.JPG
IMG_1622.JPG
IMG_1623.JPG
IMG_1624.JPG
IMG_1625.JPG
IMG_1626.JPG
IMG_1627.JPG
 
Last edited:
####Notice how the original/NOS strip has a moulded section that laps over the 1/4 glass when rolled up. The reproduction does not have this as a comparison picture shows this####


IMG_1638.JPG
IMG_1639.JPG
IMG_1640.JPG
IMG_1641.JPG
IMG_1642.JPG
IMG_1643.JPG
IMG_1644.JPG
 
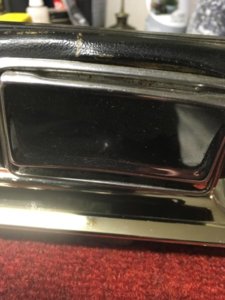
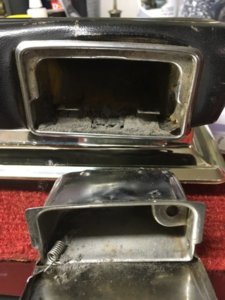
J- I’m not scrolling back thru a 1,000 threads. Can a ‘normal’ armrest easily be changed for ashtray type? I know those are not available. Thanks,Jeff.

350E17D9-48EC-4C16-AF28-EE585F2ED294.jpeg
 
J- I’m not scrolling back thru a 1,000 threads. Can a ‘normal’ armrest easily be changed for ashtray type? I know those are not available. Thanks,Jeff.

View attachment 550495
No problem, Jeff....If I am understanding correctly you want to convert a non ashtray type to an ashtray? The issue is the ashtray type has a receiver inside and the trim piece latches into that and then the ash tray slides in....I do have one I can try this on to see if you want me too...Its a pad thats not reusable or one to sell...not sure why I still have it but maybe it is because of this question, lol...
 
No problem, Jeff....If I am understanding correctly you want to convert a non ashtray type to an ashtray? The issue is the ashtray type has a receiver inside and the trim piece latches into that and then the ash tray slides in....I do have one I can try this on to see if you want me too...Its a pad thats not reusable or one to sell...not sure why I still have it but maybe it is because of this question, lol...
Maybe just careful measuring & cutting & digging out foam,lol. Just cleaning stuff while b-body is out for paint. Not a resto like yours; even had to dump a few cig ashes from over 40yrs that were stuck in it! (either 1970 in Calif., or early 80’s before I quit smoking) course I was never in backseat ( at least for smoking/riding purposes)! Don’t go crazy on my account, just curious. Jeff

D7FE9AA0-A9B1-45E2-9FE0-079A0C9D8B05.jpeg
 
Maybe just careful measuring & cutting & digging out foam,lol. Just cleaning stuff while b-body is out for paint. Not a resto like yours; even had to dump a few cig ashes from over 40yrs that were stuck in it! (either 1970 in Calif., or early 80’s before I quit smoking) course I was never in backseat ( at least for smoking/riding purposes)! Don’t go crazy on my account, just curious. Jeff

View attachment 550497
Just confirmed...it doesn't work....I didn't think it would but gave it a shot for ya...
 
Since I inspected the rears yesterday.....I decided to check the front this AM....Glad I did because when I removed the passenger side I notice I left tape on the shoes surfaces. 2" wide tape by 6" designating the "right" side shoes and "primary" shoe to ease installation at the time...Lol...would have made for an interesting stop....It happens but was caught well before drive time:p

The ole Boeshield is keeping thing rust free...The yellow on the upper control arm is a light coat of cosmoline...

Since I had the front lifted. I decided to break the heads off the breakaway zerk fittings. If they ever need to be greased you simply remove and replace with a new fitting, grease and then replace....

View attachment 550405 View attachment 550406 View attachment 550408
Well it would’ve only pulled hard a couple times!
 

Looking at just the pics of your weather strip, the ends look almost the same as my '62. Only thing is, yours starts way down the door frame and looks to be all one piece. The '62 used two, one going down the front of the door frame and one starting above the vent frame.

Already removed in this pic.
20171126_134253.jpg


View attachment 550489

Here comes round 3...lol....cheap plastic junk...

Been there done that, crap!

Since I inspected the rears yesterday.....I decided to check the front this AM....Glad I did because when I removed the passenger side I notice I left tape on the shoes surfaces. 2" wide tape by 6" designating the "right" side shoes and "primary" shoe to ease installation at the time...Lol...would have made for an interesting stop....It happens but was caught well before drive time:p

The ole Boeshield is keeping thing rust free...The yellow on the upper control arm is a light coat of cosmoline...

Since I had the front lifted. I decided to break the heads off the breakaway zerk fittings. If they ever need to be greased you simply remove and replace with a new fitting, grease and then replace....

View attachment 550405 View attachment 550406 View attachment 550408


And why do you knock the zerk off?
 
Looking at just the pics of your weather strip, the ends look almost the same as my '62. Only thing is, yours starts way down the door frame and looks to be all one piece. The '62 used two, one going down the front of the door frame and one starting above the vent frame.

Already removed in this pic.
View attachment 550570


Been there done that, crap!


And why do you knock the zerk off?
Seem to remember something about denying water/dirt entry thru check all? And then like J says about knowing the dealer actually greased it(?)
 
Looking at just the pics of your weather strip, the ends look almost the same as my '62. Only thing is, yours starts way down the door frame and looks to be all one piece. The '62 used two, one going down the front of the door frame and one starting above the vent frame.

Already removed in this pic.
View attachment 550570


Been there done that, crap!


And why do you knock the zerk off?
The factory knocked the zerk off to ensure when the dealer/shop serviced the joints they had to replace the fitting.....There have been cars that left the factory with zero fittings not broken off...I have original parts on the X that still had zero fittings broken off...Hence is why I broke them off...Thats the way they left the factory when new...Mopar zero fitting had 2 check balls one in the tip and one in the base. Greased at the factory and the top portion with ball was broken off and the bottom ball sealed the fitting. This would allow no contamination until the car got eventually serviced....Then the shop can charger you time and labor to install new fitting and grease them, lol....

....I was prepared that is why I had 7 handy, lol....

...The pic showing the seal laying on the trunk shows it is one solid piece...the frame on the car is one solid piece....the ends are what I have shown in the pics.....Can you explain to me what your comparing here, I am lost? The cars are completely 2 different body styles and parts.....
 
Status
Not open for further replies.
Auto Transport Service
Back
Top