• When you click on links to various merchants on this site and make a purchase, this can result in this site earning a commission. Affiliate programs and affiliations include, but are not limited to, the eBay Partner Network.

Hawk-Rod: The Restoration

As usual, really good detailed photos. I am definitely cataloging all of this for when I start mine this summer. I will make every attempt to document the process as well as can be. Great job so far!
 
One way is to take the blade off your hack saw, put it thru the hole (bushing) re-attach to the handle and cut thru the sleeve. It will come right out then.

Thanks for the idea. I have done that in the past, but in this case it won't work. The control arms have a lip at the bottom that is part of the casting. There is no way to cut the sleeve that way without cutting the casting. The only way to get to it is from the top - a very frustrating experience - at least for me. I was considering putting a torch on it, but figured I would stay the course with the manual method. Maybe some heat would have worked OK, but with my luck, I would have damaged the control arm. :angry9:

- - - Updated - - -

As usual, really good detailed photos. I am definitely cataloging all of this for when I start mine this summer. I will make every attempt to document the process as well as can be. Great job so far!

Thanks Behr. Hopefully people can learn from what I do here - the good and the bad. I think the forum is a great place to get and share ideas. I have learned a lot from the forum, so hopefully folks can get some ideas from my thread too (even if it is to decide that they DON'T like something I did!).

Hawk
 
looking good!
before you know it,
you will be bolting on some new shiney parts...
 
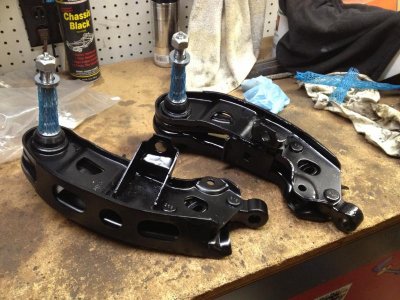
Lower Control Arms Done!

So I finished my lower control arms and learned a few things:
1) My welding skills are still not great, but getting better
2) My painting skills still suck - this is why Apex is doing my bodywork and paint!!!
3) The above two things make me a perfect restorer to match the care Chrysler used on suspension stuff!

Here are a few shots of what I did:
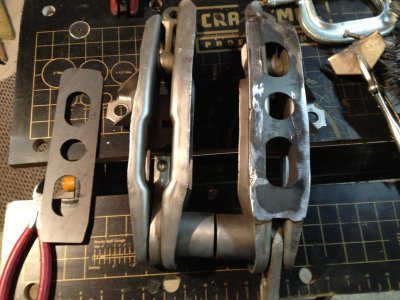
First, I wire brushed, then bead blasted. Then I welded on the plates. Here is one shot of my welding skills. (go easy on me guys...)
IMG_2171.jpg

Here is one on after some grinding and one on the side
IMG_2173.jpg

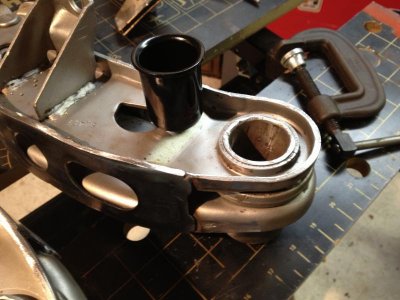
After welding on the plates, I then greased and then pressed in the new metal bushings
IMG_2178.jpg

IMG_2179.jpg

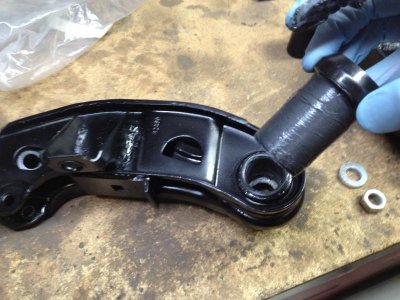
Then some paint and time to install the pivot arms. I pre-greased all parts before installation:
IMG_2181.jpg

IMG_2185.jpg

The pivot arms are greaseable, so I greased them before installation and made sure grease came out of the holes
IMG_2187.jpg

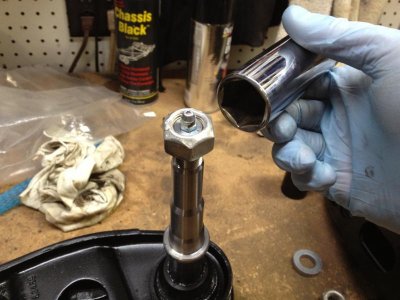
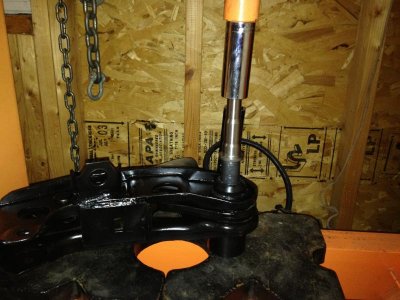
I used a socket on the nut that was partially threaded on the pivot arm. It doesn't take a lot of force to install the pivot arms (unlike the metal bushings above which are a pain in the arse).
IMG_2188.jpg

IMG_2191.jpg

Completed lower control arms ready for installation!
IMG_2193.jpg
 
Looks like a great job! You mean your not going to put in a Magnum Force or Alterkation set up? haha
 
Looks like a great job! You mean your not going to put in a Magnum Force or Alterkation set up? haha

Hej Behr!

No - can't afford either - I'm spending enough in other areas. So far my lovely bride has been very receptive to all the money flowing out for this project, but I have to keep it within budget (I'll need to wait till later for some other sneaky upgrades ;-)

Seriously, I have heard a few people say that properly set up original front ends actually handle quite well. I am hoping that with the unit body stiffening pieces, PST polyurethane front end suspension pieces and firm feel steering, improved upper control arms, etc. that it will handle pretty well.

Meanwhile, Apex continues to make good progress on the body. Now we are waiting on some AMD sheet metal that is backordered, but they are still moving ahead with various parts of the build. The engine compartment has been blasted and other clean up jobs have been done.

I also finished completely disassembling my K member, and that I out getting blasted. When it comes back I will clean it up, maybe add some welds and strengthen a few areas, paint and then start bolting some parts back on.

I hope everyone has a great Easter. Enjoy your family - you never know how long they will be around...

Hawk
 
Looking good! I'll be tackling this job next month, I was thinking about doing the LCA bushings myself, but now I'm thinking I might take them to a professional.
 
Looking good! I'll be tackling this job next month, I was thinking about doing the LCA bushings myself, but now I'm thinking I might take them to a professional.

Hi GearAddict,

If you do not have a press or a good way to chisel the old metal bushings out, that might be a good thing to farm out. But you can take your control arms and clean them up a bit first (bead blast, sand blast, wire brush, whatever) and then have the shop replace the metal bushings and pivot arms. Then you can get them back and paint them up - you just have to mask a bit more than I did.

Either way, good luck with your project...

Hawk
 
Hey Hawk,

On your K frame, you might want to consider gusseting the areas where the steering gear mounts. I plan on using a "The Works" from justsuspensions.com. comes with full suspension, wildwood brakes, and brake line kit.
 
Hey Hawk,

On your K frame, you might want to consider gusseting the areas where the steering gear mounts. I plan on using a "The Works" from justsuspensions.com. comes with full suspension, wildwood brakes, and brake line kit.

Hi Behr,

Thanks, I was planning on doing some of this. I figured this would be a good project to add some of my own metal to the steering gear mounts. While my welding skills are still a bit shaky, I figure this can be pretty straight forward to cut small pieces or metal and weld them in rather than buying a kit. Firm feel, for example, has the kit for $75. I figured if I use a few washers and metal I have laying around I can do some of this on my own. My K member should be back in about a week, so look for some updates to my thread at that time for some of my misadventures with that!

Hawk
 
been a little busy...... time to catch up my end of the thread

we drilled a couple holes just above the lower seam at the door hinge pillars, dumped in a couple spoonfuls of acid and proceeded to flush out some nastiness with the help of compressed air........ then we followed it up with bloxide weldable primer, blowing it deep into the seem and out through the crevices

hawkmetal11_zpsdae6d747.jpg


one door jamb was full of bondo and both had rust creeping out around the edges...... removing them seemed to be the right call

hawkmetal4_zps444b6c55.jpg


door skins also appear to be a no-brainer........not only eliminating hours of straightening, but access to the inside and the edges for cleanup...... makes for a much nicer and time efficient job

hawkmetal9_zps1961d34a.jpg

hawkmetal8_zps87a9685c.jpg


we cleaned the driprails and gutters, window beds, and cowl panel......pretty nice stuff

hawkmetal3_zps3962c49b.jpg

hawkmetal2_zps52e231b2.jpg

hawkmetal1_zpsa729f351.jpg


also got out ahead of some sand blasting by doing the hood compartment and other stuff that was accessible......... less to blast later, ill have primer on all the bare metal in a day or two...... we also stripped the roof today, but i forgot to get a picture

hawkmetal6_zps44ab8544.jpg

hawkmetal7_zps28836954.jpg
 
Looks good eldubb440!!! Keep up the great work! I just have to try and keep and keep up with you on my end rebuilding the front end/engine cradle. etc. I'm trying!

Some of the sheet metal pieces are also on back order, so that may slow progress if they get delayed too much. I have been on the phone trying to make sure that the door jambs I ordered get shipped right away. It seems they wanted to wait and ship all the parts together...
 
yeah.... its not like the jambs require some huge box :violent1:
 
moving on........

got the bare metal all covered up........

hawkprm1_zpsef3e0686.jpg

hawkprm2_zps9b402e20.jpg

hawkprm4_zpsde7245b2.jpg

hawkprm7_zpsc98f8e99.jpg

hawkprm6_zpsa3b4c387.jpg

hawkprm8_zpsd474e6e7.jpg

hawkprm7_zpsc98f8e99.jpg

hawkprm3_zpsab066fe1.jpg


and broke out the stiffening pieces....... we cleaned the epoxy primer off of the necessary areas and replaced it with weldable primer as well as the back sides of the stiffeners

hawkprm11_zps7e31eaf6.jpg


hawkprm5_zpse7b5a14e.jpg
 
Awesome progress on the bodywork!

I was on the phone with Jegs today. The door jambs should ship tomorrow. AMD was holding up my entire order since the door skin and corners were backordered. I had to call Jegs several times to get them to break up the order and ship the door jambs.

In other news, I got my K member back from blasting and will hopefully get a chance to work on that this weekend. I'll tell you, I feel a lot better about my welding after looking at the original welds Ma Mopar put on the K member - absolutely terrible!
 
this car is really nice........... minimal work on the roof and hood, i assume the trunk lid will be more of the same........ we are cruisin right along, gonna have a use for some lime green pretty soon........... oh yeah! :headbang:
 
K Member Work

So I didn't get as much work done as I wanted this weekend, as my mower needed to be fixed. It was only running on one cylinder (it's a twin), and I finally figured out that it had lost a pushrod on the intake valve. Strange, but it was still in place, had not destroyed anything, so I set it back, adjusted the lifter and off I went. Problem fixed. We have also been having some challenges with a sick parent, and need to figure out care needs for the future.

Anyway, I spent time on cleaning up the K member. Honestly, this is not my best work. While you can see that the factory welds were pretty bad, when I welded the plate I made into the K member my welding sucked just as bad. I did get good penetration, but man did it look bad. I obviously still have a lot to learn about welding, but I am trying and learning!

Then when I painted it I started by using Eastwood Rust Encapsulator but it had partially dried and was very thick. I tried to thin it out, but it was too far gone and I finally switched to Chassis Black, My painting still sucked, with plenty of drips, but it is now painted and protected from the elements. Since this car is intended to be a driver, I am not worried about making it mirror smooth, since no mirrors will ever be under the car!!!

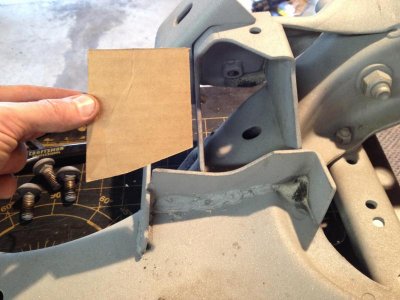
This is the back of the steering gear mount - I wanted to add a plate so it would flex less. So I first made a cardboard piece, here shown next to the area where it belongs.
IMG_2220.jpg

I then used some thick metal similar to the K Member and cut that to the same shape as the cardboard.
IMG_2223.jpg

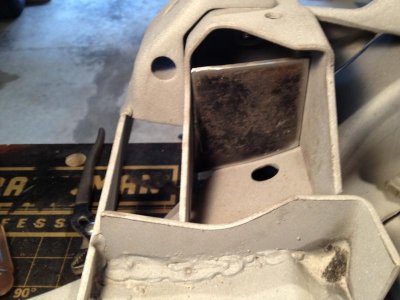
Here is the metal piece in place. Get a look at the nice original welds in this shot!
IMG_2224.jpg

Final painted K member with my crappy paint job. But at least it is ready to have some parts bolted back on...
IMG_2225.jpg
 
Looking very good Hawk! Sorry to hear you are dealing with an ill parent but as we both know as we all get older it goes with the territory. We can just be thankful we still have them. Just got back from seeing my son in Florida and my 89 year old father is already asking me when I am going to get his 1962 Plymouth Valiant out of winter hibernation so I can take him and my mother for a ride, LOL! The snow is gone so that means it is time to get the cars out and ready for cruising, even though it is still only in the low 50's.

Anyway, keep up the great work and progress reporting as I really enjoy following along with your project.

Bruce
 
Thanks Bruce! I make my fair share of mistakes as I am no expert, but I own the result. I think in the end, it will be a car that will be quite nice. At least I hope that will be the case!

Get Mom and Dad out on a ride soon - I'm sure they will love it! Yes, we have some issues with a parent. Unfortunately, it is one of those roller coaster rides where you never know what is coming next. It is quite disruptive but you have to take care of family. Unfortunately it means some other things may need to be put on the back burner. I hope it is does not affect the schedule of my car restoration too much, especially since Apex is making such good progress on the car.

Finally, today it is cold and rainy. I need some good weather so I can be out in the garage making progress on the car! Cold and high humidity are not great conditions for painting. Heck, my painting skills are bad enough with good weather conditions! :black_eye:
 
hey Hawk...... sorry to hear of your current situation, guess we all deal with it sooner or later.

we had a very productive day today, door jambs showed up and we jumped all over it....... your driver door skin also arrived, the driver door in these pics is my GTX door, but very suitable for mock up.

hawkqu4_zpsfe2d966a.jpg


hawkqu5_zps6b3becbb.jpg


hawkqu3_zpsd0df2897.jpg


hawkqu2_zps33a070cf.jpg


hmmmmmm....... Bentley or Road Runner?

hawkqu1_zps07709cdc.jpg
 
Auto Transport Service
Back
Top