• When you click on links to various merchants on this site and make a purchase, this can result in this site earning a commission. Affiliate programs and affiliations include, but are not limited to, the eBay Partner Network.

My GY8 '71 Road Runner

Hello all, I made some more progress today. I got the left front frame rail out. Officially in the oh ****, what did I do, mode :).


CA51392D-5F6E-4A5C-B4C4-17D5025148A2.jpeg


9F47DA9D-B3F1-470A-A17B-5CB6A8E5A316.jpeg


267BEBD6-ED67-4AA6-AFC9-BC113E44A3D1.jpeg


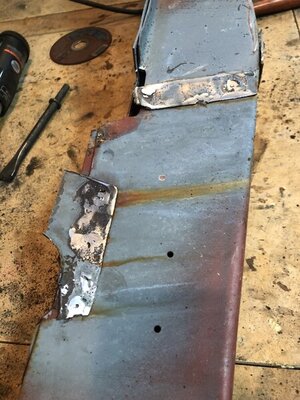
As you can see from the pics, the original one was toast. It was actually a lot worse than I thought. Initially, I was thinking about patching the rotted area. On closer inspection, there are pinholes everywhere and the bottom in really thin in several places.

68B47F2A-A1E2-4F1E-AF8B-B5E5B076B47E.jpeg


A2CDDED3-994E-4A50-8775-0E29D86E69E4.jpeg


0DEA4DB3-1014-4123-A0C2-FC361372CA66.jpeg


822920DF-5737-41DF-B636-BC3F940D7313.jpeg


I started cleaning up the donor rail. I had to remove some of the leftover pieces of metal that remained from it being removed from it’s previous host. So, drill the spot welds, pop piece off with air chissel, and sand clean:

21415938-5C4E-40DD-8089-A39E85403154.jpeg


7986292A-FBA7-438D-B069-6FB477DA4877.jpeg
A3444DF0-4203-4E28-89B2-32BC0495B617.jpeg
 
Last edited:
I’m thinking my donor rail came from an E-body. There are a few extra holes at the front and one missing hole at the back:

FCDA1B6F-89B5-40F3-9876-9A1ACBA7AB2D.jpeg


Three holes at front (bottom is donor):

D87B8DF7-BE88-4EDA-A7C9-3F9F606329A0.jpeg


Missing a hole at the back (top is original one):

ACF5BD1A-7046-42F9-B513-12A77AB0306D.jpeg


I have to say I was pretty intimidated taking this on. I took my time, measured, double checked everything and asked questions on this site. It went well, in my opinion.
 
Officially in the oh ****, what did I do, mode :).
Haha. Yes, I have been there - you have to go backwards before you can go forwards sometimes. But it looks like you have a good plan and you are making great progress.

Keep rocking on!

Hawk
 
Just read some of this. That could be an E-body rail and make sure it is an early one cause the later ones have different mounting holes in the rail for the bumper bracket do to the pushed out bumper design... Judging by this pic it appears those bumper bracket holes are different in measurement unless the picture below is an optical illusion... Time to check and make sure.
d87b8df7-be88-4eda-a7c9-3f9f606329a0-jpeg.jpg
 
Last edited:
On another note The original color is not bad...
IMG_0819 (Small).JPG
IMG_0820 (Small).JPG
 
Just read some of this. That could be an E-body rail and make sure it is an early one cause the later ones have different mounting holes in the rail for the bumper bracket do to the pushed out bumper design... Judging by this pic it appears those bumper bracket holes are different in measurement unless the picture below is an optical illusion... Time to check and make sure.
View attachment 1024461


It’s an optical allusion. I measured the holes in both and they are the same. I appreciate the input! When I saw the extra holes I was like WTF, I think I’m losing my mind :screwy:.


Are those images of your RR? If so, do you have a build thread on it?

Thanks again for the info!
 
It’s an optical allusion. I measured the holes in both and they are the same. I appreciate the input! When I saw the extra holes I was like WTF, I think I’m losing my mind :screwy:.


Are those images of your RR? If so, do you have a build thread on it?

Thanks again for the info!
Yep it's mine and no on the build thread. Been sitting painted for 9 years now. Have all the parts and no time been doing family things.. It's a 71 SSP got a 383 4 speed for it. I have the standard RR hood and an air grabber set-up for it..
 
Still at it! Test fitting the donor rail:


A09B5E75-0191-44F9-B2CF-18659F60E33E.jpeg


7BBDC06D-7D8D-4F75-82D0-91A6D335D977.jpeg


33244322-0AB1-4113-8FB0-C19F72BD912E.jpeg


I put the K Frame in to make sure everything lined up and keep everything in place. Make the noise...

928F020B-0F29-481F-AA6F-6F0DB0A83319.jpeg


08BFCA38-0C42-4EA1-8178-93013B505BF6.jpeg


I had to add some metal to the ears and clean up the rail. I used Metal Prep rust converter after sanding and then primed with copper weld-through primer. I then tacked the donor rail in:


A336B818-A9A4-494C-9BF3-567E93126CFB.jpeg


A6468D34-BDE7-4B18-9EED-20067306C1BE.jpeg


923A98FC-32C4-4C22-B171-C92C8B119856.jpeg


CF806405-357A-4DF7-995B-56C3925AE3EE.jpeg


55F4E6D2-C82C-425C-82EE-92042E71C3E8.jpeg
 
Next up, I have to replace both inner fenders. The left side is a little worse than the right. Both hood mount areas are completely rotted as is the battery tray and a bunch of other areas are pretty crusty:


BEB5E8A3-DA4E-4E2F-8F61-99DA74164340.jpeg


9D735BB5-73E2-4D67-8BAA-6A65A76EEE9D.jpeg


024EC3FF-E7C9-4818-A5D6-F537D4EFB289.jpeg


Thanks for looking!
 
Mine were as bad as yours. I bought the replacements at Dales Cuda shop.
B & E-body inner fenders are the same.
Inner fender.jpg
 
Today I started working on the inner fenders. I removed the left side.

D7E16E63-2CA7-4C6E-BC47-EEDA8200A1A1.jpeg


After doing so, it revealed more rot in the firewall than I originally saw. I knew there was some hidden under the Mopar sticker but wasn’t expecting it to be so bad:

531B018C-F728-402A-9EB4-AC3CC86BF8EC.jpeg


33D2F463-D259-4A7D-848C-A2F7DD2B5ABE.jpeg


I also knew about this area under the dash and had a patch panel from a donor that I was planning on splicing in:


CB63200C-0E56-4A5E-AC83-0E452FB920A7.jpeg


C7121930-28A3-44C7-9825-FFD5C33B579C.jpeg


So I removed the top of the firewall, cant remember what that part’s called...the cowl??, anyway, found a lot of rot hidden under there. Looks like my RR got hammered from years of leaking water on the left side. Everything from the bottom corner of the windshield down to the framerail was effected. Lucky me.


9385D3BC-F3E9-4B17-8883-606916CE3158.jpeg


Looking through my hoard of parts/pieces that I’ve been amassing for the past 7+ years, I found this. Did’t know I had bought it:

226FD2FE-6B9A-4ED2-A2EF-3F486C655184.jpeg


So, this happened:


82C67B15-B95A-41EB-A097-DDB2E8AC6868.jpeg


To look at it really freaks me out. I’ve never attempted anything like this before. I’m taking things one area at a time so I don’t get overwhelmed. Since I removed the firewall, I’m going to remove the rest of the floorboard and use a full AMD replacement. I was hoping to save at least the right front half but looking at it closer, the center is pretty crusty and it’s banged up a little. Thanks for looking.
 
That is crazy to look at with all the metal gone. With the front open like that, it almost looks like an Isetta lol. It's going to look great once you are done with it.
 
That is crazy to look at with all the metal gone. With the front open like that, it almost looks like an Isetta lol. It's going to look great once you are done with it.


Yeah, It’s pretty crazy. I was literally staring at the firewall for about 20 minutes trying to decide if I was going to remove it or not. Then I brought the new one down from the loft and looked back and forth at the two for about another 20 minutes waying the pro’s and con’s. Then I just went for it. Once I saw the hole I was like WTF??!! My wife came in to check on me and her mouth dropped. Go big or go home I guess.
 
Today I decided to try and make my first patch. I’ve never done anything like this before so, here goes. The left side of my cowl had, what I thought was a small rotted area that was hidden under a Mopar sticker when I purchased the car. After power washing after I removed everything, I found the rot under the sticker. Then, when I removed the left side inner fender, I found more rot under the support bracket.

ED4917AD-CDFB-4F0C-A4A0-21FD99FD953E.jpeg


40FCC485-0422-4950-B20F-C17004DA3B31.jpeg


I started by making a poster board templet:

D4FF6CE2-3197-4D26-B193-5A3A394E6E38.jpeg


Then I cut out the outline in sheet metal. I used electric shears which, are pretty awesome. Cut through the metal like it was paper. I then placed the sheet metal on the cowl and used it as a buck to rough out the shape.

F89EF536-E516-4A0B-949A-BE2D0795B6D8.jpeg
87DD5CAB-81B2-4741-B758-FC468A0DF923.jpeg


I also used a 1” bolt to hammer the correct radius in the corner. I could’t find my auto body hammers so I used one of my framing hammers. I then traced the patch onto the cowl and cut it out. Then test fitted:

4E6D9AA3-ABF8-4338-BE5B-3EAF2C6C7FB3.jpeg


I then welded it in place. As you can probably tell from the images below, I had a few areas of blow through. I’m still playing around with the settings on my welder. It works fine on the new metal but doesn’t like the old stuff I guess:

1E588CD5-829E-4F5B-B34C-6DA80446C8C5.jpeg


A8A640DC-0D75-4145-8259-ADA90665EFD2.jpeg


I’m thinking I can place a piece of copper behind the spots and plug them up. Is this acceptable or should I try something else? I’m on the fence about how this came out. I’m not sure I’m happy with the results.
 
Good call in going with the GY8.I have a 71 Sport Fury parts car in that color and it would have been a real looker when it was in good shape many years ago.It's pretty rough now,unfortunately.

I think the pic you posted is the first time I've seen a RR in that color but I've seen some 71 Cuda's online and they look stunning in GY8 as well and really stand out among the many orange/red/black examples out there.
 
Excellent work! You can, as you asked, use copper backing plates for your welds. Are you still using flux core? You'd be better off with .023 solid wire and gas for the thin stuff.
I like the speed that you're progressing with now that you're back into it. :)
 
Excellent work! You can, as you asked, use copper backing plates for your welds. Are you still using flux core? You'd be better off with .023 solid wire and gas for the thin stuff.
I like the speed that you're progressing with now that you're back into it. :)


Yes, I switched to solid .023 wire with gas. Thanks for the response!
 
Auto Transport Service
Back
Top