• When you click on links to various merchants on this site and make a purchase, this can result in this site earning a commission. Affiliate programs and affiliations include, but are not limited to, the eBay Partner Network.

1971 Speedipus Rex

things have slowed down due to the new kid, but I have been plugging away - heres what I have been working on:

Started putting the doors together, the regulators were filthy from years of sitting - time to work some magic:

dirty on the bottom and clean on top!

IMG_20121201_173658.jpg

IMG_20121201_173825.jpg

IMG_20121201_184107.jpg


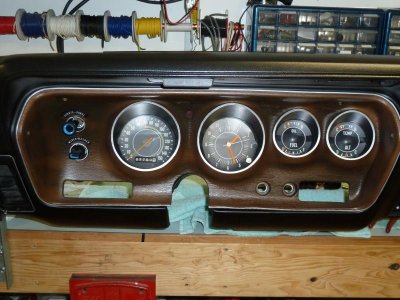
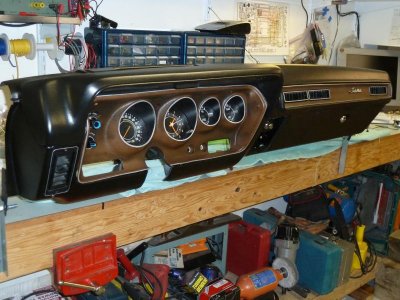
The big one - restoring a 71 rallye cluster from start to finish. This is how I did it.

what i had to start with:

IMG_20121129_012035.jpg

IMG_20121215_000329.jpg


no more old wiring gremlins!!!

IMG_20121129_031234.jpg


Light switch:

IMG_20121129_011934.jpg

IMG_20121129_011942.jpg

IMG_20121129_043105.jpg

IMG_20121129_043055.jpg


high/low beam floor switch:

IMG_20121215_204510.jpg

IMG_20121215_211438.jpg


Wiper switch:

IMG_20121130_034954.jpg

IMG_20121216_155117.jpg


Temp control:

IMG_20121129_050814.jpg

IMG_20121129_050800.jpg

IMG_20121130_050934.jpg

IMG_20121129_053240.jpg

IMG_20121214_235207.jpg

IMG_20121215_000138.jpg

IMG_20121215_011939.jpg

IMG_20121216_154931.jpg

IMG_20121216_155054.jpg


- - - Updated - - -

Now the hard part:

IMG_20121130_060445.jpg


started on the gauge face plates, I used the 3M Headlight restore kit, I thought "what the hell, they're both plastic, should work for this as well" I also did this to the temp control plate as well:

IMG_20121214_224313.jpg

IMG_20121214_230406.jpg

IMG_20121214_234626.jpg


Went to a hobby shop and got a paint that I thought would look close to original and this stuff was bang on and it went on beautifully with no runs - Tamiya TS-1 Red Brown. Goes on light brown but dries to what I wanted. First I sanded and painted the whole shelll:

IMG_20121215_004446.jpg


I wasn't sure how to get the black in the wood like on the original, so I improvised, I thought if I could paint the background in a matt black and paint over top it might bleed through the paint. I used a acrylic paint which was messy to work with and it ran like crazy and pooled up alot so i had to keep wiping it down so the layer wouldn't get to thick, It was a PITA and I reccomend a different method but it ended up in my favor, I tried fingerpainting all the areas where the black was on the shell:

IMG_20121215_032249.jpg

IMG_20121215_032243.jpg

IMG_20121215_032235.jpg


Next I painted a very light layer of the red brown again:

IMG_20121215_033928.jpg

IMG_20121215_033921.jpg

IMG_20121215_033913.jpg


next I sanded the gauge pods and wiper/light switch areas, masked them and painted them a semi gloss:

IMG_20121215_221336.jpg

IMG_20121215_221323.jpg


Now this was the most stressful step of them all - applying the silver to the outer edges of the pods, switches and shell, I used a automotive GM Silver, comes as a 2 for 1, light bruch or can be used as a pen, i used the brush. It is hard to work with, you have to keep moving in one direction and it with thicken up on you if you overlap the previous area too much (it starts to dry pretty quick) This would be easy if you were a pin stripper, but for us joes its passable and didn't end up to bad:

IMG_20121215_235351.jpg

IMG_20121215_235416.jpg

IMG_20121215_235344.jpg

IMG_20121215_235333.jpg


Now all together: (I tried taking different pics in different light)

IMG_20121216_141602.jpg

IMG_20121216_145817.jpg

IMG_20121216_150013.jpg

IMG_20121216_150110.jpg
 
This would be easy if you were a pin stripper, but for us joes its passable and didn't end up to bad:

G'day Dangina. You're not giving yourself enough credit. Your attention to detail for a common "joe" is awesome mate. I've only just picked up on your project after Roadrunnerman put me onto it for the sound deadener in the roof. You're doing an awesome job, and your tips and photos on restoring the dash and controls is something I'm gonna try and follow, I'm just not sure my patience and attention to detail will be as good as yours. Well done on a superb resto (luv the colour combo). Congrats on the little one. :VB toast:
 
This would be easy if you were a pin stripper, but for us joes its passable and didn't end up to bad:

G'day Dangina. You're not giving yourself enough credit. Your attention to detail for a common "joe" is awesome mate. I've only just picked up on your project after Roadrunnerman put me onto it for the sound deadener in the roof. You're doing an awesome job, and your tips and photos on restoring the dash and controls is something I'm gonna try and follow, I'm just not sure my patience and attention to detail will be as good as yours. Well done on a superb resto (luv the colour combo). Congrats on the little one. :VB toast:

Cheers mate! thanks for the kind words,
I gotta buddy in Melbourne and when he was here, the only thing he liked more than lifted pickup trucks was mopars!
I've own a couple mopars in the past and this is kinda all my experiences rolled in one project. Those that own these cars know that if you have any sort of engine or exhaust , its hard to hold a conversation with the person next to you. I wish to eliminate that. I went a little overboard but in the end i added about 90-100lbs to the car. Most guys if they want can skip the sound deadner in the trunk and save them about 30 lbs. I only did it because I'll have a sub box back there (that will be easliy disconnected and removable for track days) and my fuel pumps will also be in the trunk. I'm building this car so i can drive it as much as possible here in canada. It will have all new firm feel and hotchkis suspension in it (not installed yet) with big brakes front and rear. I'm not going crazy on the engine (probably 500-550hp at the most) i'm gonna build it more for reliability.
 
Excellent. I look forward to the updates. Merry Xmas and stay safe.:merrychristmas:
 
I went a little overboard but in the end i added about 90-100lbs to the car. Most guys if they want can skip the sound deadner in the trunk and save them about 30 lbs. I only did it because I'll have a sub box back there (that will be easliy disconnected and removable for track days) and my fuel pumps will also be in the trunk. I'm building this car so i can drive it as much as possible here in canada. It will have all new firm feel and hotchkis suspension in it (not installed yet) with big brakes front and rear. I'm not going crazy on the engine (probably 500-550hp at the most) i'm gonna build it more for reliability.

Great work and a very interesting. I read Ehrenberg for years (but had a break where i stopped following) and have always been interested in having a well rounded, nicer handling than stock B-body. I've wanted to do many of the things you have with the unibody stiffening, improved suspension, and also the sound deadening and powder coating. I'm really looking forward to seeing more of your finished project. Thanks for all the pictures and description of the processes. Also liked the dash rebuild as that has always been quite daunting for me but you made it look pretty straight forward.

I'm really looking forward to hearing how this thing handles and drives with your mods and suspension component beefing/upgrades. Don't forget to post some pics of your dad's 72 at some point!

Thanks for the kind words - The old man has been working on my mom's 71 over the past winter - just waiting for some parts before he can put the hemi in the car -


sorry guys the posts have been slow - being a new dad and getting overrun at work, my progress has slowed down, but hasn't stopped - heres what I have been up to so far:

I got the new rallyes from year one :
IMG_20130111_142722.jpg

IMG_20130112_152140.jpg

IMG_20130112_145354.jpg

IMG_20130111_143618.jpg


1 1/2" clearance to the rear springs
IMG_20130111_143725.jpg


1/1/4" to inside front lip I ay get a 1" spacer down the road:
IMG_20130111_144024.jpg


My firewall was cracked when I first bought the car I figured it was because of the heavy heater core being held on by 4 screw heads and nothing else, So i ade a pattern and took it to the metal fab shop here intown and made my own aluminum plate so all 4 points are on the same plane - its made from 1/4" aluminum!

IMG_20121219_140659.jpg

IMG_20121226_215322.jpg


got the kframe back from the powdercoaters!

IMG_20121230_172748.jpg


cleaned up my heater box, put it together, sealed it, new weatherstripping, good as new!

IMG_20121217_233301.jpg


got my quarter windows tinted with factory tint:

IMG_20121219_173420.jpg


rear window with limo tint

IMG_20121219_173521.jpg


cleaned up my rear window regulators

IMG_20121217_004204.jpg


painted the window wiper assembly - looks darker in person:

IMG_20121224_045457.jpg


I have the windows in, just wasting so much time aligning them up - I never wanna do this again when its over - i probably wasted at least 3 hours per window. will take a pic when finished. Also have the underside of the dash finished but I was gonna go with a stock clutch setup but now I'm thinking hydraulic. More posts to come...
 
Those wheels look great. Are they 17" billets? Nice job on the extra heater support. Are those windows tinted 30%+? Window regs look good. What did you use to clean them up? The photo makes those wiper rods look bright for sure but they still look good. How's the new baby doing. Should be getting pretty big.
 
i really admire your innovation with your entire dash assembly. looks friggen sweet!
 
i really admire your innovation with your entire dash assembly. looks friggen sweet!

Thanks! was getting worried that it wouldn't turn out.

Those wheels look great. Are they 17" billets? Nice job on the extra heater support. Are those windows tinted 30%+? Window regs look good. What did you use to clean them up? The photo makes those wiper rods look bright for sure but they still look good. How's the new baby doing. Should be getting pretty big.

They are cast aluminum, and yes I believe that they are the 30% tint for the side windows. Baby is getting big and long! thanks for asking!
 
Everything is looking great, I cant get over how nice you got the instrument lens all cleaned and clear as a windex-ed window. Those Year One rally's look great, cant wait to see them with the tires on them.
 
have you put in the harness yet? if so how do you like it, debating on whether or not its worth the price tag and would love some feedback
 
good job on the dash, your car is looking great - I just finished my dash as well. I thought share how I got mine rejuvenated as it looked exactly like yours in the first pic posted, kind of faded & almost chalky looking - it had me wondering how i was going to get it looking better. I washed mine up really well with dawn dishsoap & let it dry, I also thought about painting it but really was hesitant to put much build on it so I thought about clear coating it but didn't want high gloss.

I found this at Lowes of all places - Valspar clear satin enamel:
http://www.valsparpaint.com/en/find...spray-paint-1/premium-enamel-spray-paint.html

This stuff was amazing, I tried it first on the vent insert for the dash as I had an extra & wanted to see how it finished out, came out great so I did the dash face with it, 2 coats & its beautiful - no messing with paint at all!

Keep up the good work, project looks great!
P1060029.jpg
P1060028.jpg
 
you been keeping pretty busy, and all looks very nice, keep at it thanks for sharing:headbang:
 
what did you use to do the silver lining? looks stellar! absolutly love this thread
 
Great job on the dash, I have to admit when I was scrolling threw the pics I thought "that looks like hell" then I got to the end and was thinking "WOW that really came out nice". Love the early 70's RR.
 
Incredible job, I hope my Coronet turns out half as well. I know I'll be using some of your ideas in my project. Thanks for posting
 
have you put in the harness yet? if so how do you like it, debating on whether or not its worth the price tag and would love some feedback
sorry not yet , gotta finish the hydraulic clutch first, then put the dash in!

good job on the dash, your car is looking great - I just finished my dash as well. I thought share how I got mine rejuvenated as it looked exactly like yours in the first pic posted, kind of faded & almost chalky looking - it had me wondering how i was going to get it looking better. I washed mine up really well with dawn dishsoap & let it dry, I also thought about painting it but really was hesitant to put much build on it so I thought about clear coating it but didn't want high gloss.

I found this at Lowes of all places - Valspar clear satin enamel:
http://www.valsparpaint.com/en/find...spray-paint-1/premium-enamel-spray-paint.html

This stuff was amazing, I tried it first on the vent insert for the dash as I had an extra & wanted to see how it finished out, came out great so I did the dash face with it, 2 coats & its beautiful - no messing with paint at all!

Keep up the good work, project looks great!
View attachment 103383
View attachment 103384

WOW! I gotta say that it makes my way look 10 times longer to do with the same results(probably cheaper too) I was looking to do it your way originally but haven't found a clear that would bring back the brown, thanks for sharing!

sorry I don't have any pics for you guys right now, I finished installing the headliner and quarter panel covers, speakers and then my camera crapped out. I'm currently working on a hydraulic clutch, then I'll get my dash installed and front/rear windshield in, expect some pics by the end of the weekend!!!
 
Auto Transport Service
Back
Top