You are using an out of date browser. It may not display this or other websites correctly.
You should upgrade or use an alternative browser.
You should upgrade or use an alternative browser.
My 1967 Belvedere Convertible Plans and Restoration (aka - Mad Scientist Build)
- Thread starter conv67bdere
- Start date
- Local time
- 9:40 AM
- Joined
- Jan 1, 2013
- Messages
- 8,050
- Reaction score
- 3,453
- Location
- Mascoutah, Illinois
The ceramic paint came out nice .. great job
Looks pretty good other than the wrong brand of motor haha. Hopefully you get it knocked out pretty quick so you can get back to the 67. Good luck
Yeah 747Mopar . . . SORRY . . . but I gotta get this done and then . . .
BACK TO THE 67 ! ! !
It's driving me crazy that I can't be working on it with this time off ! ! !
Arghh . . .
- - - Updated - - -
The ceramic paint came out nice .. great job
Thanks Tallhair for the compliment . . . I was very pleased with the results too ! ! !
69 Charger RT/SE
Well-Known Member
Now I've got some Questions:
The car has a bunch of holes in the floor pan with plastic "plugs" installed.
Are they "necessary" ?
What's their purpose ?
I always understood that the holes in the bodies that were filled with plastic plugs were drain holes required in the building process. They were necessary because all the bodies were submerge dipped in tanks to metal prep and prime before painting. They would have been for draining the excess liquid.
Someone should be able to enlighten us on this.
The only reason I can see for installing the plugs in a resto is if the re-builder was doing a concourse level job or if the holes exist in any new or old panels and they will not be welded shut.
Any other thoughts?
Shoe Box update . . .
My daughter flew in from Arizona so I've not spent as much time on the cat as I'm spending time with her while she's in town -
but I have been able to "sneak" out to the garage and get some things done on the shoe box . . . I say sneak, but she was out there with me working on it ! ( smile )
Got the valve covers re-installed with new gaskets ( they were leaking pretty badly ) - I hate oil leaking all over my engine !
And I got my "new shiney" wire looms installed - wires run, cut to length and ends installed . . .
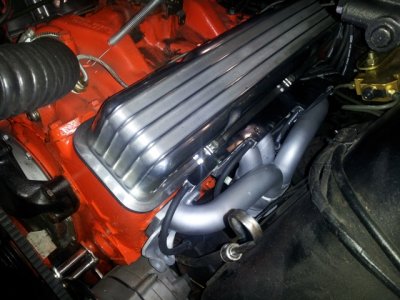
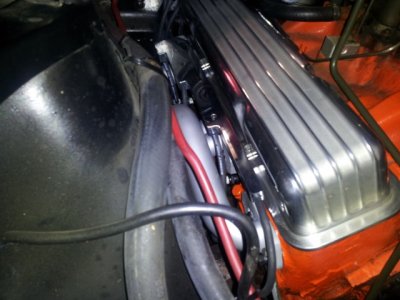
Get the new electronic ignition distributor installed ( old one had half the gasket gone and leaking too ) - as well as the new coil - all wires hooked up !
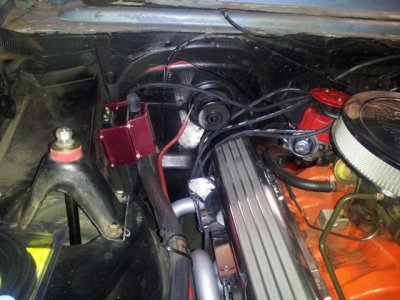
Now to get the distributor wired to the coil, power to the coil, and see if this thing fires !
Found a couple fouled pugs . . . this ought to run a whole lot better now - can't wait to see ! !
Almost there . . . uh, but I'll need a new set of exhaust pipes run . . . probably let the muffler shop do it for me.
Driving to the muffler shop with straight headers ! ! ! Woooohooo ! ! ! Probbly get pulled over by every cop on the road ! !
My daughter flew in from Arizona so I've not spent as much time on the cat as I'm spending time with her while she's in town -
but I have been able to "sneak" out to the garage and get some things done on the shoe box . . . I say sneak, but she was out there with me working on it ! ( smile )
Got the valve covers re-installed with new gaskets ( they were leaking pretty badly ) - I hate oil leaking all over my engine !
And I got my "new shiney" wire looms installed - wires run, cut to length and ends installed . . .


Get the new electronic ignition distributor installed ( old one had half the gasket gone and leaking too ) - as well as the new coil - all wires hooked up !

Now to get the distributor wired to the coil, power to the coil, and see if this thing fires !
Found a couple fouled pugs . . . this ought to run a whole lot better now - can't wait to see ! !
Almost there . . . uh, but I'll need a new set of exhaust pipes run . . . probably let the muffler shop do it for me.
Driving to the muffler shop with straight headers ! ! ! Woooohooo ! ! ! Probbly get pulled over by every cop on the road ! !
- Local time
- 9:40 AM
- Joined
- Jan 1, 2013
- Messages
- 8,050
- Reaction score
- 3,453
- Location
- Mascoutah, Illinois
Appreciate the update on the shoebox and that's really cool your daughter chipped in to help out. Maybe she can take some audio / video on the way over to the muffler shop.
Nice looking engine .. I like the valve covers and everyone hates leaks LOL
Nice looking engine .. I like the valve covers and everyone hates leaks LOL
747mopar
Well-Known Member
Sounds like fun to me haha. The engine looks great "if this is how nice your Chevy looks under the hood I can't wait to see your 67". Everything looks really nice, headers, valve covers, neat plug wire routing and it looks all freshly painted "NICE JOB 67". Congrats on the daughter time and I don't blame you for taking some time off "got your priorities straight". I'm praying my kids don't go far, they have a way of becoming "your life" and can't imagine not having them close by but that's life. I'll be patiently waiting for some 67 updates.
It's ALIVE . . .
Got the last of the wires hooked up - checked 12V at the coil and that was good. Turned the key a couple times and it was struggling - so asked my daughter to start the car while I was prepared with the timing light . . . and . . . Vrooooooooooooooom . . . . it FIRED UP ! ! !
Oh - remember . . . straight headers . . . ( smile )
Timing was close but pretty far advanced . . . . little tweaking and it'll be good ! !
The good news . . . BACK TO WORK ON THE BELVEDERE NOW ! ! ! !
YAY ! ! !
Now back to our regularly scheduled program . . .
Last edited:
kb67mopar
Well-Known Member
For a Chevy looks pretty good....it shows your attention to detail. Glad you got it wrapped up!
"Excellent"
For a Chevy looks pretty good....it shows your attention to detail. Glad you got it wrapped up!
Yeah guys . . . will be back in the shop working on the Belvedere today . . .
got rain here now, so what else is there to do ? ! ? ! ?
Glad to have the shoe box almost wrapped up - trip to the muffler shop and that thing should be purrrrrrring ! ! ! Whooohooo ! ! !
Now it's time to GET BACK TO WORK ! !
Had a great, wonderful visit from my oldest daughter over the holidays - she flew in from Arizona to spend some time with me ! ! What a wonderful Christmas present . . . and she was even out there helping me with the 66 Shoe Box too ! ! The good news - she's planning on moving back to NC sometime soon ! !
Looking forward to that very much ! !
She's back in Raleigh visiting her 1/2 sister, nephew, and mother so now it's time for me to get back to work on the Belvedere . . .
A WHOLE week with nothing to show . . . while Speedy, 747, H2E are all speeding toward completion ! ! !
So let's jump back onto it with both feet . . . first we need to remove the lower bracket holding the trunk hinge to the wheel well . . .
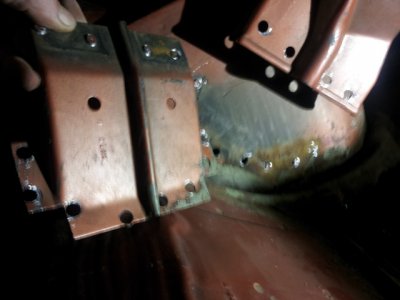
Then remove the upper brace that supports the convertible top hydraulic cylinder . . .
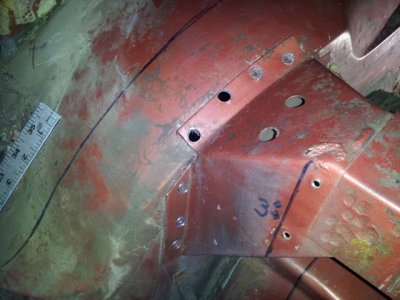
The it's time to cut out the inner portion of the wheel well - so it can be moved inboard about 3 inches . . .
I cut the wheel well about 1" from the inner tub to leave a flange for me to weld back to the trunk floor.
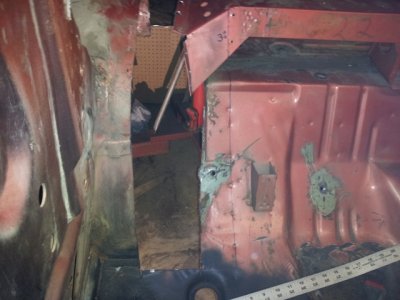
Then after getting the inner well removed, I wen back to address the remaining 2" piece of metal that remained . . .
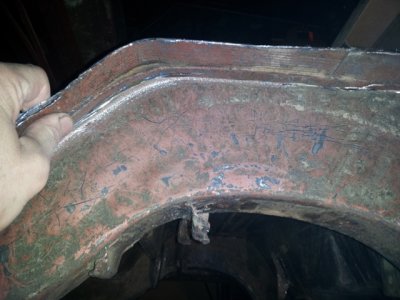
Got that mostly cut out and pretty close to the frame rail the entire length of the wheel well . . .
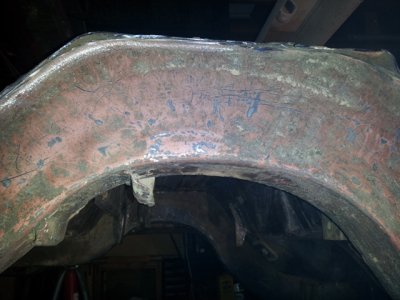
Which left me with a whole bunch "more" room to fit a really big tire in there ! ! ! ( smile )
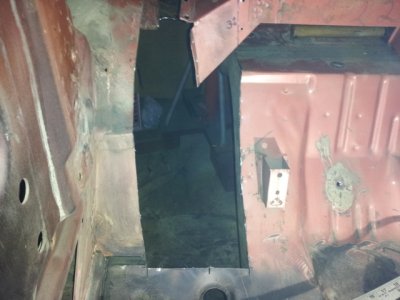
Next, I'll have to take a look at the outer wheel well and figure out how to de-hump it and provide more wheel room ! !
And allow me to move the tire out closer to the quarter - don't want the tire too far inboard . . . not the look I want.
Had a great, wonderful visit from my oldest daughter over the holidays - she flew in from Arizona to spend some time with me ! ! What a wonderful Christmas present . . . and she was even out there helping me with the 66 Shoe Box too ! ! The good news - she's planning on moving back to NC sometime soon ! !
Looking forward to that very much ! !
She's back in Raleigh visiting her 1/2 sister, nephew, and mother so now it's time for me to get back to work on the Belvedere . . .
A WHOLE week with nothing to show . . . while Speedy, 747, H2E are all speeding toward completion ! ! !
So let's jump back onto it with both feet . . . first we need to remove the lower bracket holding the trunk hinge to the wheel well . . .

Then remove the upper brace that supports the convertible top hydraulic cylinder . . .

The it's time to cut out the inner portion of the wheel well - so it can be moved inboard about 3 inches . . .
I cut the wheel well about 1" from the inner tub to leave a flange for me to weld back to the trunk floor.

Then after getting the inner well removed, I wen back to address the remaining 2" piece of metal that remained . . .

Got that mostly cut out and pretty close to the frame rail the entire length of the wheel well . . .

Which left me with a whole bunch "more" room to fit a really big tire in there ! ! ! ( smile )

Next, I'll have to take a look at the outer wheel well and figure out how to de-hump it and provide more wheel room ! !
And allow me to move the tire out closer to the quarter - don't want the tire too far inboard . . . not the look I want.
747mopar
Well-Known Member
Boy you dug right in didn't you, looks great 67. So what's the plan on tying back into the floor with the wheel well and are you just going to put a filler piece in and weld the original wheel well back in?????? "Yeap" lots more tire in there, how much room is there in yours originally "the Chargers measure 14" lip to wheel well". I sometimes wish I would have done that but I think I can fit close to 12" in there so we'll see. Great progress, can't wait to see what you do.
- Local time
- 9:40 AM
- Joined
- Jan 1, 2013
- Messages
- 8,050
- Reaction score
- 3,453
- Location
- Mascoutah, Illinois
I'm really glad you had a great visit with your daughter and this is an excellent post brother .. really well laid out and documented. Well done and I"m looking forward to seeing how you finish it out.
747mopar
Well-Known Member
DidoI'm really glad you had a great visit with your daughter and this is an excellent post brother .. really well laid out and documented. Well done and I"m looking forward to seeing how you finish it out.
More mini-tub work . . .
Was trying to decide between cutting the wheel well back to the frame tab, or cutting off the frame tab and going all the way to the edge of the frame.
Here's my thought in a picture . . . by cutting to the tab it would have not let me move the inner wheel well as far, but would have left the strength of the frame spot welded to the flooring of the car.
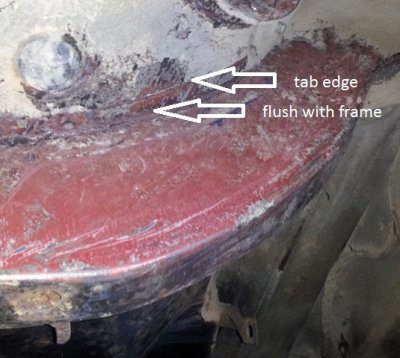
Decided on moving the inner wheel well as far as possible and giving me as much room for tire as possible.
This left (2) pieces of metal ( the frame and the floor ) next to each other with no support - to fix that I came back and welded them together the entire length of the wheel well cutout - this added the strength back into the unibody structure.
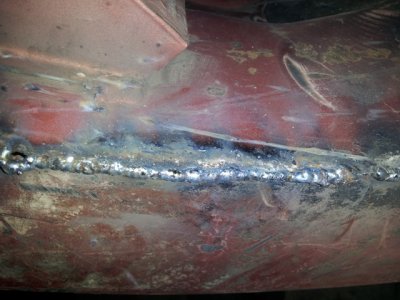
Now the piece that was cut out will go on top of this and be welded into place - doubling the weldment area.
Think this will work and keep the strength in the car frame ( maybe it'll actually improve the strength ! )
- - - Updated - - -
I think the Belvedere is about the same measurement - and I could have gone the same way, but since I'm here and it's this far torn apart, I figured I might as well mini-tub it and not have to worry about coming back to do it again at a later date . . . a 12" wheel might be plenty, but if I find a 14" wheel that I really like, now I'll be able to go with it and not worry about it not fitting.
Look at it as "pay me now or pay me later" . . . I'll tackle it now and use it for more welding practice too ! !
- - - Updated - - -
Really enjoy the music of 3 Doors Down . . . but this is one of their songs that really gets me going ! ! ( there's a bunch of them )
[video=youtube;pgV6VUinDEA]http://www.youtube.com/watch?v=pgV6VUinDEA[/video]
Was trying to decide between cutting the wheel well back to the frame tab, or cutting off the frame tab and going all the way to the edge of the frame.
Here's my thought in a picture . . . by cutting to the tab it would have not let me move the inner wheel well as far, but would have left the strength of the frame spot welded to the flooring of the car.

Decided on moving the inner wheel well as far as possible and giving me as much room for tire as possible.
This left (2) pieces of metal ( the frame and the floor ) next to each other with no support - to fix that I came back and welded them together the entire length of the wheel well cutout - this added the strength back into the unibody structure.

Now the piece that was cut out will go on top of this and be welded into place - doubling the weldment area.
Think this will work and keep the strength in the car frame ( maybe it'll actually improve the strength ! )
- - - Updated - - -
Boy you dug right in didn't you, looks great 67. So what's the plan on tying back into the floor with the wheel well and are you just going to put a filler piece in and weld the original wheel well back in?????? "Yeap" lots more tire in there, how much room is there in yours originally "the Chargers measure 14" lip to wheel well". I sometimes wish I would have done that but I think I can fit close to 12" in there so we'll see. Great progress, can't wait to see what you do.
I think the Belvedere is about the same measurement - and I could have gone the same way, but since I'm here and it's this far torn apart, I figured I might as well mini-tub it and not have to worry about coming back to do it again at a later date . . . a 12" wheel might be plenty, but if I find a 14" wheel that I really like, now I'll be able to go with it and not worry about it not fitting.
Look at it as "pay me now or pay me later" . . . I'll tackle it now and use it for more welding practice too ! !
- - - Updated - - -
Really enjoy the music of 3 Doors Down . . . but this is one of their songs that really gets me going ! ! ( there's a bunch of them )
[video=youtube;pgV6VUinDEA]http://www.youtube.com/watch?v=pgV6VUinDEA[/video]
Happy New Year to everybody at FBBO ! ! !
Got through 2013 . . . now to see what 2014 will bring ! !
Got through 2013 . . . now to see what 2014 will bring ! !
HAPPY NEW YEAR to everybody at FBBO
Greatest website on the internet !
Looking forward to seeing a couple new Mopars on the roads this year as a couple are getting very close to completion now ! ! Keep up the great work guys ! !
- Local time
- 9:40 AM
- Joined
- Jan 1, 2013
- Messages
- 8,050
- Reaction score
- 3,453
- Location
- Mascoutah, Illinois
Happy New Year to you too
Mini-tub . . . inner wheel wells plan . . .
747Mopar . . . you asked how I was going to fit it back together . . . here's the plan . . .
The inner wheel well will be moved back against the frame rail to provide as much room as possible . . .
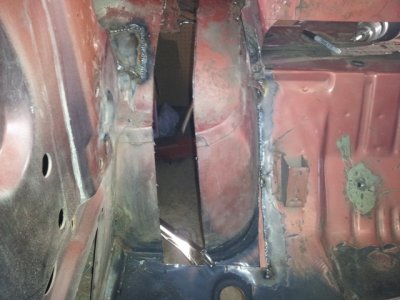
Then ( like many of them ) I'll cut strips and weld them into the gaps to finish off the wheel well . . .
Looks like it's going to be "interesting" . . . to say the least . . .
BUT FIRST :
I'm going to work on the outer wheel well and figure out how to de-hump it while the well is out of the way and easier to access ! ! !
747Mopar . . . you asked how I was going to fit it back together . . . here's the plan . . .
The inner wheel well will be moved back against the frame rail to provide as much room as possible . . .

Then ( like many of them ) I'll cut strips and weld them into the gaps to finish off the wheel well . . .
Looks like it's going to be "interesting" . . . to say the least . . .
BUT FIRST :
I'm going to work on the outer wheel well and figure out how to de-hump it while the well is out of the way and easier to access ! ! !
Last edited:
Similar threads
- Replies
- 0
- Views
- 424
- Locked
- Replies
- 2
- Views
- 2K
- Replies
- 46
- Views
- 3K


