dpstark2
Well-Known Member
Hello all,
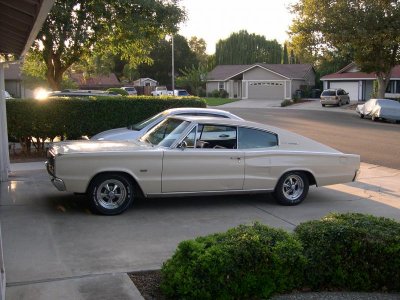
I wanted to start a thread to catalog my progress and open up some discussion- and maybe help a few people out along the way. I bought my '67 Charger about two years ago. It ran, but that's about all. One of the reasons I bought it is that the body is all original and free of rust in the critical, hard to find and replace panels. It only has one dent- the driver's side door. After a lot of work to get it roadworthy, I found it had a cracked crank that was spewing oil out the pilot bushing hole in the crank. So I built a 440 for it. That one ate a cam (let this be a lesson on using high quality break in oil and having your valve springs checked). So I built it again. It's on the road and doing pretty well now (and it runs cool, too!).
My overall goal is to make this car a fun driver with as many modern comforts as I can muster. Long term, I plan on converting to Megasquirt fuel injection, complete with ignition control. That's about to start. I also have a set of 3.55's and a Sure Grip to put in, along with a console and floor shifter. A/C will happen down the road a bit. I plan to leave the body alone for now. Most everythign that can wear has been replaced. I have a lot of pictures here, but I need to get some more current ones up.
We're all looking for info- if anyone has any questions, please ask!
-Doug
==========================================
Some funny anecdotes:
1. The HVAC box was full of corn kernels.
2. The motor had mismatched left and right rocker arms (and not 8 + 8, either).
3. The HVAC ducting had been "fixed" in one spot with a cut open can of carb cleaner.
4. Someone that owned the car really, really like candy.
Important stuff done so far:
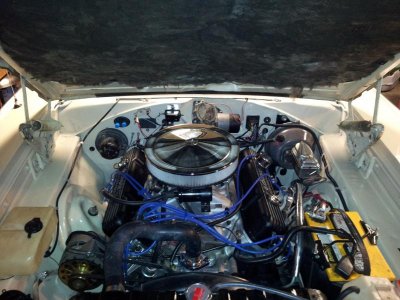
Motor:
'74 440 block
Factory forged crank, factory rods
Comp 224/230 cam and roller rockers
10:1 compression Ross pistons
Edelbrock RPM heads
Edelbrock Performer RPM manifold
Edelbrock 800 cfm carb
TTI 2" headers and 3" full exhaust
Aluminum water pump and housing
MP viscous fan
Electrical:
200 A alternator for future electrical upgrades
Fully rewired with M&H wiring harness
Rebuilt the factor gauge cluster, EL now works
Added headlight relays
Moved headlight motor relays to the engine bay
MSD 6A ignition box
Transmission:
B&M shift kit
1-2 shift correction spring
5800 rpm governor
B&M 2400 rpm torque converter
Suspension and drivetrain:
Fully rebuilt suspension
New XHD leaf springs
Disc brake coversion (A-body parts)
Rebuilt steering column and shift mechanism
3.55 Sure Grip (soon!)
Misc:
Painted the engine bay and dash
Fixed window mechanisms
Rebuilt HVAC box
Factory radiator cleaned and resoldered
I wanted to start a thread to catalog my progress and open up some discussion- and maybe help a few people out along the way. I bought my '67 Charger about two years ago. It ran, but that's about all. One of the reasons I bought it is that the body is all original and free of rust in the critical, hard to find and replace panels. It only has one dent- the driver's side door. After a lot of work to get it roadworthy, I found it had a cracked crank that was spewing oil out the pilot bushing hole in the crank. So I built a 440 for it. That one ate a cam (let this be a lesson on using high quality break in oil and having your valve springs checked). So I built it again. It's on the road and doing pretty well now (and it runs cool, too!).
My overall goal is to make this car a fun driver with as many modern comforts as I can muster. Long term, I plan on converting to Megasquirt fuel injection, complete with ignition control. That's about to start. I also have a set of 3.55's and a Sure Grip to put in, along with a console and floor shifter. A/C will happen down the road a bit. I plan to leave the body alone for now. Most everythign that can wear has been replaced. I have a lot of pictures here, but I need to get some more current ones up.
We're all looking for info- if anyone has any questions, please ask!
-Doug
==========================================
Some funny anecdotes:
1. The HVAC box was full of corn kernels.
2. The motor had mismatched left and right rocker arms (and not 8 + 8, either).
3. The HVAC ducting had been "fixed" in one spot with a cut open can of carb cleaner.
4. Someone that owned the car really, really like candy.
Important stuff done so far:
Motor:
'74 440 block
Factory forged crank, factory rods
Comp 224/230 cam and roller rockers
10:1 compression Ross pistons
Edelbrock RPM heads
Edelbrock Performer RPM manifold
Edelbrock 800 cfm carb
TTI 2" headers and 3" full exhaust
Aluminum water pump and housing
MP viscous fan
Electrical:
200 A alternator for future electrical upgrades
Fully rewired with M&H wiring harness
Rebuilt the factor gauge cluster, EL now works
Added headlight relays
Moved headlight motor relays to the engine bay
MSD 6A ignition box
Transmission:
B&M shift kit
1-2 shift correction spring
5800 rpm governor
B&M 2400 rpm torque converter
Suspension and drivetrain:
Fully rebuilt suspension
New XHD leaf springs
Disc brake coversion (A-body parts)
Rebuilt steering column and shift mechanism
3.55 Sure Grip (soon!)
Misc:
Painted the engine bay and dash
Fixed window mechanisms
Rebuilt HVAC box
Factory radiator cleaned and resoldered