• When you click on links to various merchants on this site and make a purchase, this can result in this site earning a commission. Affiliate programs and affiliations include, but are not limited to, the eBay Partner Network.

1964 Plymouth Savoy Build

Sorry but I've never heard of rotating the crank while priming the oil pump...And I 've built a few motors myself...but never heard that one before.
Can you enlighten...always willing to learn.
 
Wedges oil holes to rockers in cam only line up a couple of times a rotation. Hemis have a hole and a small groove in oil supply to rockers shafts.
 
Last edited:
What he said. I always do a slow rotation of the crank, with the v/c's off, to ensure all the rockers have oil coming out.
 
Last edited:
It's always a good practice to prime the oiling system of any fresh engine rebuild before start up.It's to remove all the air gaps within the oiling system before starting the engine so as there is no moving parts waiting to get oil.all the parts are pre lubed with assembly oil and the Cam and lifter face are important for that because they get there oiling from slinging oil from the crankshaft like the cylinder walls. I did the oil prime with valve covers off to make sure during priming that the oil goes up the push rod tubes and feeds the rocker arms correctly and to see the oil coming out of all the rocker arm oiling holes. You can have proper oil pressure at the main oil galley with a gauge reading but still not have proper oiling to all rocker arms and you can't see that unless you have the valve covers off when priming. Sometimes to get the oil to both sides of the rocker arms the motor needs to be turned to get the oiling passages to line up but I don't think it's mandatory to do so but it's good practice to see that everything is getting oil. When I started priming the engine with the drill the right side got oil to all the rockers but the left side was still dry. I rotated the motor maybe 180 degrees and then the left side started to get oil. With that I know the rocker arms are getting proper oiling. That's the number one cause of roller rocker failing because of lack of oiling. Possibly caused by rocker arm shafts being installed upside down. It's just added insurance to know everything is oiling properly. Thanks for all the responses and advise. By the way the oil pump turns counter clockwise.
 
Years ago I had a DOH! moment that could have been very costly. I put together a 340 with a 360 crank, made it a 372, with W2 heads. The rocker shafts I got for it came from Ed Hamburger back before they turned to the dark side. Got it primed, but didn't fully watch the rockers. Lit it off, broke the cam in, put a few miles on it, then pulled the covers off for inspection and took apart the oil filter[ Oberg unit] for a look see. Shavings everywhere and lash caps laying in the heads, torched some rockers and custom pushrods. Had to run lash caps as Hogan's didn't set the valve stem heights the same. I was able to get some more bushed W2 rockers and pushrods that would work plus a new pair of shafts. I talked to the gent that did my machine work, Lee Muir up by Laguna Seca, about what happened. He also used to run Shadow Racing which was the mother ships west coast r&d skunk works facility. He and Petty developed the W2 heads and was quite familiar with what was going on. Turned out the engineering guru's back in motor city blundered on the drawings/specs on the shafts and got the oil holes out of position. The rocker would almost have to point straight down for the oil hole to line up to the shaft. What he recommended was to put in some banana grooves into the shaft once I determined where the hole was on the shaft when the rocker was closed. Mopar and the aftermarket at that time never corrected that problem. Lucky for me he had a mountain of those parts available for replacement.
 
Right, I heard those horror stories too. Better to be safe then sorry, the shaft holes are larger then stock on these but no offset on the holes. They Are parallel with the studs.I'm assuming to elemenate a left and right specific.
 
Just found this thread, excellent work Chuck Marshall and some nice reading hours for me to spend.
Been collecting parts a couple of years for building a -63 Savoy MW and this thread seems to have it all!

/ Johan
 
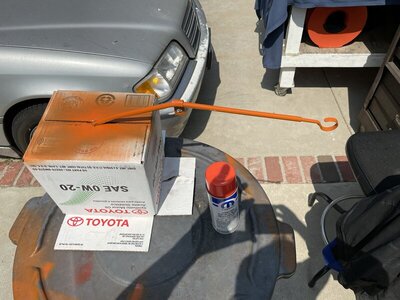
I have a question for you guys if anybody can answer. What is the proper color of the oil dipstick pull ring and tube. I'm going to guess that the whole thing was painted orange when the motors where painted correct? Thanks to any reply
 
Boy Chuck you've got me there. I don't remember at all. Something that I've never paid attention to. However, I've always painted them the color of the engine unless I've done a lot of chrome, then I go with the chrome on the dipstick and tube. Which I will do on the 64 Dodge 440 426 Street Wedge. On on both of my Maxies, I will paint them Race Hemi Orange.
 
Boy Chuck you've got me there. I don't remember at all. Something that I've never paid attention to. However, I've always painted them the color of the engine unless I've done a lot of chrome, then I go with the chrome on the dipstick and tube. Which I will do on the 64 Dodge 440 426 Street Wedge. On on both of my Maxies, I will paint them Race Hemi Orange.
Right, that's what I've seen either hemi orange or chromed ones. I don't think the original ones where chrome so I will paint it hemi orange since it's metal now. I was thinking of leaving the loop on the stick the metal color rather then painting it orange. I don't know what do you think or paint it all orange? I'm going to say the factory painted them all hemi orange
 
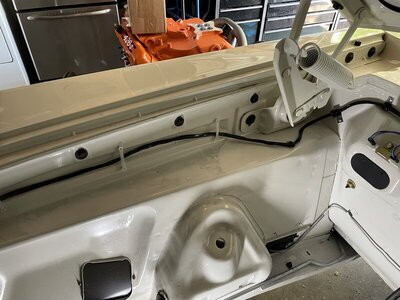
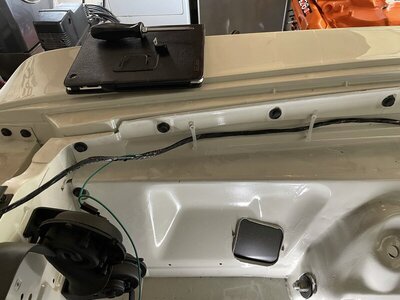
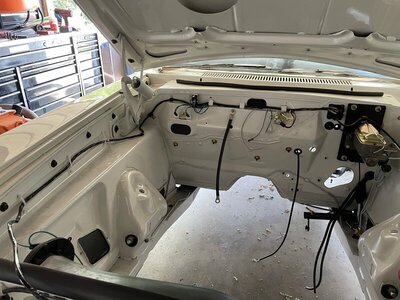
Got the max wedge engine harness mounted and ran along the passenger side. Installed the harness hold down brackets as well. These are Max Wedge Spacific. And running the harness along the fender instead of down along the sides of the engine compartment. I guess to get it away from the heat of those big axhaust manifolds.

IMG_2012.jpg IMG_2013.jpg IMG_2014.jpg IMG_2015.jpg IMG_2018.jpg
 
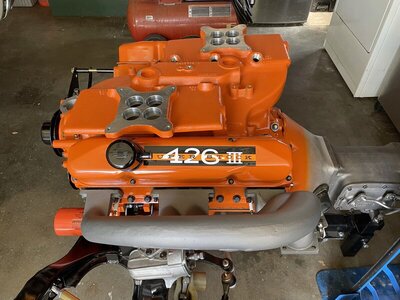
Also painted the oil dipstick Hemi Racing Orange like everything else. Lol! Changed the valve cover stickers to Stag III! According to the guys at A&A Transmission who did the manifold does say running the fuel filter in the middle of the manifold is factory correct for a 64 Stag III, the earlier Stag II and 413 ran them along the valve cover on the right. FYI.

IMG_2016.jpg IMG_2017.jpg IMG_2019.jpg IMG_2020.jpg
 
I would paint it the color of your engine, to be honest as I always do on mine.
Except on my 426 Street Wedge.

Avoiding the Mopar crowd asking..."Why didn't you paint the tab on the dipstick?"

On the 426 Max Wedge engines...What color did you paint your engine-Race Hemi Orange or Hemi Orange?

I am gathering the needed parts now to rebuild my 1963 426 Stage II Max Wedge engine. However after I finish rebuilding the 383 for my 1970 Cuda. Which I have already machined and in boxes right now ready to assemble.

I will paint the 426 Stage II Max Wedge engine Race Hemi Orange...Mopar P4120751.
Hope this help...
By the way...When do you think that you'll have her finished?
 
Chuck...What gage is the ground cable that I see you've used there on the firewall?

Funny that we are typing at the same time...So you've answered my questions already.

What size is that intermediate fuel line..5/16 ( as the original was ) or 3/8's?
I recently upgraded the 64's intermediate fuel line to 3/8's along with the 3/8's fuel tank spending unit, but kept the 63's factory original 5/16's.

Love what you already done. Keep the pictures coming as I know that I am not the only one watching and enjoying your project's progress.
Yes, Racing Hemi Orange. I upgraded all the fuel lines and sending unit to 3/8. The ground cable is slightly larger then the ground and power at the battery. It’s supposed to be. In the early thread when I made the cables I wrote what size cable the engine ground was but I’m not remembering. Lol. I’ll need to look
 
Yes, Racing Hemi Orange. I upgraded all the fuel lines and sending unit to 3/8. The ground cable is slightly larger then the ground and power at the battery. It’s supposed to be. In the early thread when I made the cables I wrote what size cable the engine ground was but I’m not remembering. Lol. I’ll need to look
Ok the ground cable in the engine compartment I made from one I found online for sale. It was an original max wedge engine ground cable 1 gauge wire and 15" long. I found as close to original terminal ends to match. Hope that helps!
 
Got the metal tops fixed with the vinyl and attached the cat whiskers,also installed the door lock button grommets for the front door.

IMG_2023.jpg IMG_2024.jpg IMG_2025.jpg IMG_2026.jpg IMG_2027.jpg IMG_2028.jpg IMG_2029.jpg IMG_2030.jpg
 
Auto Transport Service
Back
Top