You are using an out of date browser. It may not display this or other websites correctly.
You should upgrade or use an alternative browser.
You should upgrade or use an alternative browser.
1970 Charger HELP!!
- Thread starter Tim Nist
- Start date
Ironbuilt
Well-Known Member
Maybe start by introducing yourself to the forum here.
https://www.forbbodiesonly.com/moparforum/forums/welcome-wagon.9/
Then post your interior questions here.
https://www.forbbodiesonly.com/moparforum/forums/interior.29/
Your questions will get a lot more responses if you post them in the correct sections.
Good luck.
https://www.forbbodiesonly.com/moparforum/forums/welcome-wagon.9/
Then post your interior questions here.
https://www.forbbodiesonly.com/moparforum/forums/interior.29/
Your questions will get a lot more responses if you post them in the correct sections.
Good luck.
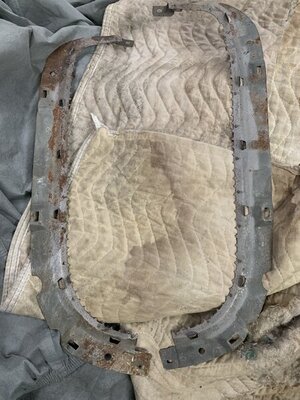
You're going to need these in your adventure:View attachment 1134907 I just purchased a 70 Charger that was in pieces and not bagged and tagged. I'll have a million questions, and for no good reason, lets start with this one. Left and Rt hand piece, where in the interior does this go?
I purchased the FSM at a swap meet a few years ago, but they are available on eBay, etc.
I purchased the parts catalog (3 volume set) a few months ago from themotorbookstore. They did a very good job of reprinting pictures from the Mopar originals. Very legible. You can sometimes find the original Mopar parts catalogs on the internet for sale. However, condition is not guaranteed, pages might be missing, updates / supplements might not be included; and they cost several times more than the reprints from themotorbookstore.
https://www.themotorbookstore.com/1970-1971-chrysler-car-body-chassis-parts-book.html
Last edited:
Tim Nist
Well-Known Member
Thanks guys, the smallest of things are the hardest
Thanks guys, the smallest of things are the hardest
We are insufferable picture addicts here. Can you post some pictures of your car and introduce yourself in the Welcome Wagon forum as suggested by @Ironbuilt in post #2 above?
coronet68mx
Well-Known Member
- Local time
- 3:45 PM
- Joined
- Sep 18, 2014
- Messages
- 4,791
- Reaction score
- 9,933
- Location
- Uruapan, Michoacán, México
I did the same thing (bought a basket case), buying a factory service manual was the best investment I made along with joining this forum.Thanks guys, the smallest of things are the hardest
Check out the 70 Charger registry Lots of stuff over there...
1970 Dodge Charger Registry (1970chargerregistry.com)
Click on the tech and spec section
http://1970chargerregistry.com/Misc/pdffiles/70parts_catalog.pdf
1970 Dodge Charger Registry (1970chargerregistry.com)
Click on the tech and spec section
http://1970chargerregistry.com/Misc/pdffiles/70parts_catalog.pdf
Last edited:
Tim Nist
Well-Known Member
Looks like the interior window sill for the rear, side windows.
My rear window sill on driver's side:
View attachment 1134926
Tim Nist
Well-Known Member
Thanks for that info, I got that put aside. Now, how does that plastic back window interior trim attach? It looks like it uses the pinch weld, but it seems back wards. Pics? ThanksLooks like the interior window sill for the rear, side windows.
My rear window sill on driver's side:
View attachment 1134926
Mine are out (i.e., no pictures), but going from memory the lower corner pieces are held in by small screws. The upper corner pieces are probably held in place by screws too, but I don't remember.
All of my interior trim pieces are currently wrapped up and boxed for safekeeping.
You're going to need those books in post #4 above. Might as well get them sooner than later.
All of my interior trim pieces are currently wrapped up and boxed for safekeeping.
You're going to need those books in post #4 above. Might as well get them sooner than later.
Last edited:
Tim Nist
Well-Known Member
I ordered them right away, yesterdayMine are out (i.e., no pictures), but going from memory the lower corner pieces are held in by small screws. The upper corner pieces are probably held in place by screws too, but I don't remember.
All of my interior trim pieces are currently wrapped up and boxed for safekeeping.
You're going to need those books in post #4 above. Might as well get them sooner than later.
Tim Nist
Well-Known Member
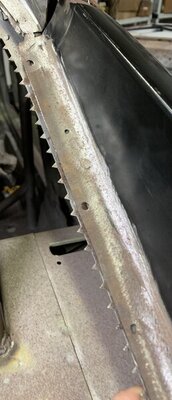
I got it figured out. The trim goes on these headliner cleats after headliner install. They were in one of the many boxes. Plus the rail that runs behind the package tray


Mine are out (i.e., no pictures), but going from memory the lower corner pieces are held in by small screws. The upper corner pieces are probably held in place by screws too, but I don't remember.
All of my interior trim pieces are currently wrapped up and boxed for safekeeping.
You're going to need those books in post #4 above. Might as well get them sooner than later.


440 Charger
Well-Known Member
Its all patience and will.Thanks guys, the smallest of things are the hardest
Similar threads
- Replies
- 71
- Views
- 5K
- Replies
- 76
- Views
- 3K
- Replies
- 10
- Views
- 1K


