• When you click on links to various merchants on this site and make a purchase, this can result in this site earning a commission. Affiliate programs and affiliations include, but are not limited to, the eBay Partner Network.

73 Roadrunner 340 Auto

GOOD NEWS:
The old girl (only called that because the last owner was a really nice lady) is back on the ground. Pretty dirty and in need of a bath, a cut and buff, and some stripes but it is a step forward.
IMG_4576.jpg


BAD NEWS
She wont make it to the Frankenmuth Autofest this Friday. Try as I did, it is not going to happen. It is just me (okay sometimes the wife helps) doing all the work and when things don't work out it messes everything up. No trim rings, the package shelf needs replacing, the exhaust tips are wrong, the brakes need bleeding, the engine needs to be started and broken in, and on and on and on and on. I ordered up some more parts and I will just have to put them on when the come in. No time crunch now. That is a bit of a relief and I am going to celebrate by starting up a bonfire , opening up a beer. and finally taking a deep breath. You know, silver lining crap.
 
GOOD NEWS:
The old girl (only called that because the last owner was a really nice lady) is back on the ground. Pretty dirty and in need of a bath, a cut and buff, and some stripes but it is a step forward.
View attachment 1164023

BAD NEWS
She wont make it to the Frankenmuth Autofest this Friday. Try as I did, it is not going to happen. It is just me (okay sometimes the wife helps) doing all the work and when things don't work out it messes everything up. No trim rings, the package shelf needs replacing, the exhaust tips are wrong, the brakes need bleeding, the engine needs to be started and broken in, and on and on and on and on. I ordered up some more parts and I will just have to put them on when the come in. No time crunch now. That is a bit of a relief and I am going to celebrate by starting up a bonfire , opening up a beer. and finally taking a deep breath. You know, silver lining crap.

Trust me, I understand the disappointment. As you know, I had to cancel my cross country trip with your car's evil twin. However, it is the right decision. Better to get stuff right than to overly rush things and end up with issues becuase of that.

Enjoy your beer, satisfied that you have done an amazing job so far. You are almost done - keep up the good work and bring it across the finish line as time allows!

Hawk
 
Did manage to get a little more work done. Went to paint the under dash and figured I would start with getting the color right.
Tried my normal SEM Landou Black but ran into problems. I prepped the way I always do but something was not happy. Only thing I can think of was the ashtray was in the sun and must have been a little too hot for the paint. I was wearing gloves so I didn't notice. Looked like this:
IMG_4621.jpg


I got a little gun shy so I switched paint maker and color. Tried a few colors and found that Rust-Oleum High heat BBQ black #7778830 (two coats) and two coats of Rust-Oleum acrylic enamel 2X paint and primer Matte Clear (two coats) gave the perfect color and texture match to the original finish.
Like this:
IMG_4630.jpg
IMG_4637.jpg
IMG_4629.jpg


Did I mention I strongly dislike masking off things

IMG_4620.jpg
IMG_4636.jpg
IMG_4636.jpg
IMG_4634.jpg


On the plus side the back glass and trim are ready to go in

IMG_4631.jpg


Almost forgot! Bled the brakes, installed the fuel line from the pump to the carb, fixed the distributor (my mistake when I changed the pickup it slipped off the two weights) and set the timing at 12 degrees before. IMG_4628.jpg
 
Is this you car's former owner?

GettyImages-587503964.jpg


(Or are you tired of that one already?)
 
Got a little more done:
Back glass is in
IMG_4655.jpg


Carpet is in and steamed into shape
IMG_4653.jpg
IMG_4654.jpg
IMG_4658.jpg


Seats are back in
IMG_4667.jpg


Car is loaded and headed to the engine shop for first fire.
IMG_4673.jpg

On the hoist to check last few details
IMG_4676.jpg
IMG_4677.jpg
IMG_4679.jpg

IMG_4680.jpg
 
Looks great - it is all but finished now! Hopefully the engine startup and the final assembly goes well.

I have found that mounting the front bumper and getting it to fit can be a royal pain in the arse. On my 70, I had to loosen the front fenders where they attached to the radiator support and slide them over to center them. I had installed the fenders and aligned them by eye, but they were off and I didn't see it until I put the bumper on.
 
Small hiccup on the first fire. Somehow the distributor was 180 degrees off. Not sure how that happened. May have been when the torque converter was bolted up and the engine was turned to get to all the bolts. No big deal, just took a little to troubleshoot and spin around. Second hiccup was when the power steering pump started whistling during the cam break-in, as it blew trapped air out. It was jacked up and worked stop to stop prior to firing, but apparently not enough as it spewed some fluid out. All things considered it ran very well. Starts right up and has a nice lope to it. I will post a video as soon as I figure out how to get it from my phone to this forum. Has around 60 PSIG oil pressure at 2400 RPM. Just need to put some break-in milage on it now to get the last few bugs out. And YES, I am wearing a very big smile right now!!!
[COLOR=rgba(0, 0, 0, 0.85)][/COLOR]
 
Awesome! I love that feeling when there’s life to a long project
 
The garage is clean (well cleaner) and the stress level has dropped a boat load since the engine is running as it should. Just a few minor things to button up and then back to cut and buff. Followed by the graphics package, bumpers, remaining lights, and trim rings. Still waiting for the correct exhaust tips and l am doing dent/ding removal on grill trim and wheel arch(s).

IMG_4731.jpg
IMG_4732.jpg
IMG_4736.jpg
IMG_4737.jpg
IMG_4738.jpg
IMG_4739.jpg
 
Had to trailer the car back home as there are a lot of gravel roads in this neck of the woods. But it is home now and needs a final cut and buff before the last few parts can go on.
The hood, trunk, and roof were done earlier but I think I will do them again. The paint is really nice with only a few areas of orange peel. This is one (probably the worst) if the photos show it.
BEFORE
IMG_4754.jpg


AFTER
IMG_4756.jpg


Left side done:
IMG_4757.jpg


Right side done:
IMG_4759.jpg


Tomorrow's plan is to cut the hood, trunk, and roof. Should not take too long as these were done once already, but some peanut brain sprayed some black outside with the garage doors open and got a little overspray on the paint. Fricking pumkinhead!! Should really listen to that inner voice.
 
Very Very Nice Mr. Builderguy. The car looks great congrats on the progress. I really like the color cannot wait to see it with strips. As usual your attention to detail is impressive. I think you, HawkRod and I need to pick a spot somewhere between us when Hawk Rod does his road trip so we can meet up and have some beers and relive our builds. I am buying!!!!
 
I will be retiring shortly, so that CAN be made to work. Would be a lot of fun!!
 
Sanded both sides down again. Will do the hood and trunk tomorrow.

IMG_4767.jpg
IMG_4766.jpg


The tail lights worried me a little as the sockets were in bad shape and I was not sure if I would need to replace them. I ended up having to use acid to get one of the bulbs out. I cleaned them them up, new paint, and removed someone's trailer wiring attempt. Gave them a temporary ground and:
SUCCESS:
IMG_4768.jpg


Bonus, everything else works too!!! :). One more item off the punch list.
 
Changed direction and decided to get the grill top trim (post #351) done. Small problem (well not really a problem just a situation) found when sanding the trim. It appears that the trim was painted a light grey, just like the highlighted edges on the black grill. I have the trim down to bare metal and it looks great. Hate to cover with paint, so maybe just a matte clear on it to match the plastic grill highlights. IDK, this will take a little more thought. Going south for a week so I will have some time to figure it out.

IMG_4773.jpg
IMG_4774.jpg
 
Very Very Nice Mr. Builderguy. The car looks great congrats on the progress. I really like the color cannot wait to see it with strips. As usual your attention to detail is impressive. I think you, HawkRod and I need to pick a spot somewhere between us when Hawk Rod does his road trip so we can meet up and have some beers and relive our builds. I am buying!!!!

Love this idea, although my car will be the beater of the bunch - but that never stopped me from a free beer! At the moment, our trip is now tentatively May 2022. Hope we can work something out!
 
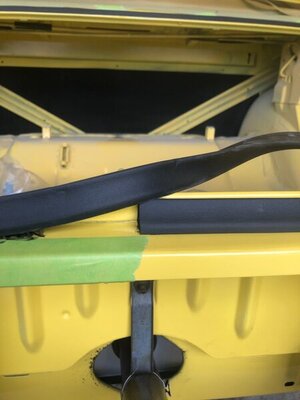
Finished sanding the car. We then lost power for some planned maintenance so I could not buff it. Switched to gluing the trunk seal in. That went much easier than I thought. No clothes pins with the adhesive I used. More like contact cement with a little more give. Taped off where I did not want any residue, then put a line on the car and a line on the molding, spread this out a little, let it tack up for about 15 seconds, then put in place.
IMG_4869.jpg
IMG_4858.jpg
IMG_4866.jpg
IMG_4861.jpg
IMG_4862.jpg
IMG_4872.jpg


On to the tail lights. My lenses were not that good so I got some from a Satellite that were much better but still needed to be polished up. One of my bezels was dorked up so I used one from the came with the lenses. Wrong color so I painted both so they would match.

IMG_4873.jpg
IMG_4874.jpg
IMG_4875.jpg
IMG_4868.jpg
 
The correct tip finally arrived. :) In all fairness, they did correct a problem, which is more than a lot of sellers do.

IMG_4882-1.jpg


Was able to get the first pass done on the trunk lid, the roof, and the front clip. Soooo, about halfway done with the wool pad. Then a scratch remover pass followed by a finishing pass.

IMG_4880.jpg
 
Auto Transport Service
Back
Top