• When you click on links to various merchants on this site and make a purchase, this can result in this site earning a commission. Affiliate programs and affiliations include, but are not limited to, the eBay Partner Network.

Swapping a Borgeson steering box in a 1970 Charger

I did change the K member years ago but I thought the replacement K was a 70-72 B body K. I thought those were all the same, 70-72....Heck, Now I really don't know.
The Steering arms have been in place for almost 15 years. The car tracks straight, it has equal turns to lock left and right.
 
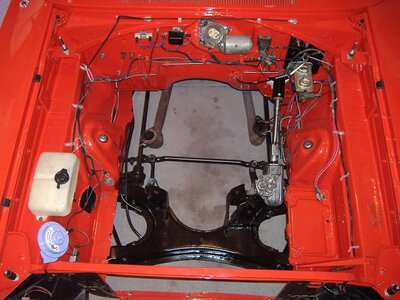
Here is an e-body k in a 70 and down b-body. That angle with b-body pitman means the steering box cannot be on center, must use the curved ones. The 70 b-body k lines that shaft up near perfect, notice the heavy angle of the steering column coming out of the firewall. The 70 b-body k lays the steering box about on the frame rail.

5433406-A12_RM23M9A280_engine_compartment_120.jpg
 
Last edited:
I see, your only issue is the steering shaft angle, not a big deal just expect a little faster wear on the pot coupling. It still is way less angle than they ran o dodge pickups.
 
I see, your only issue is the steering shaft angle, not a big deal just expect a little faster wear on the pot coupling. It still is way less angle than they ran o dodge pickups.
Oddly, my steering box and column seem to be at no angle that I can see.
If there is.....At an average of maybe 2000 miles a year, I doubt I'll wear one out right away!
Thank you for your expertise. I love to learn new things.
 
Hmmm...maybe there is some slight angle there, huh?

SST 128.JPG


It looks like the coupler is tilted a little.


Maybe about the same as this one?

70 K (2).jpg
 
On the 70 GTX I had to use a Borgeson because a factory p/s box wouldn't fit with these bigass tubes. It had manual when we got it. The Borgeson box is angled toward the fender well just a bit. On the pitman I one of those Moog units that doesn't have a part number. Just says pitman arm on the box.
upload_2022-5-25_17-40-29.jpeg

upload_2022-5-25_17-41-21.jpeg
 
Holeeee Crap...You really were limited on space in there.
Thank you for the info.
 
Thank you KD for taking the time to get pictures and post things as you dig into this upgrade. Lots of great pictures and interesting information. :thumbsup: :luvplace::thankyou:

Just for information I have replaced the pitman arm 3 times on my Charger and only replaced the idler arm once in the last 15 years. Each time the pitman arm was definitely moving up and down noticeably. I am looking forward to seeing your results.
 
I was able to put in a couple hours today and got the Firm Feel unit out. I'm sure that this was the hardest part of the project.
First up, I took the Borgeson coupler and marked a spot on it with a paint pen.

Borg 28.JPG


Then I rotated the input shaft full right, then full left. The range is 3 5/8 turns. Bergman stated to establish center so half of 3 5/8 turns is 1 and 13/16 turns...essentially a little more than 1 3/4 turns. I did this several times to confirm the center, then marked 12:00 on the input shaft splines.

Borg 30.JPG


I took the Pitman and attached it temporarily, then painted a stripe down the case to signify proper alignment.
Incidentally, I noticed that the resistance in turning the input shaft is noticeably greater toward the center. It tightens up as you sweep from full lock to center, then eases up once you're past center when turning to full lock right. THis is sort of like a Firm Feel at the center while being easier to turn in tight maneuvers. This may or may not be evident once hydraulic pressure is applied.

Borg 29.JPG


Borg 31.JPG


It is essentially impossible to have the Pitman arm on wrong. It has 4 index marks spaced evenly apart to properly locate it.


Borg 32.JPG


Next up, knock the roll pin out of the stock coupler, slide the coupler toward the firewall a bit......
Remove the steering column...

Borg 36.JPG


The coupler is beat up a bit. I've had the column in and out of the car a few times.

Borg 33.JPG


The coupler cover is one I bought from Steer and Gear more than 10 years ago. I'll clean it up and reuse it.

Borg 35.JPG


I've always had crappy luck with the stock type seal clip. I can get them to fit but then....Attaching the coupler to the steering box never seems to be easy. I've asked for advice online and I get equal parts mine just slides right on and I had to tap it on with a hammer.

Borg 48.JPG


Given that...I'll ask again. How do you guys attach the coupler to the steering box? When there is that slight interference fit, there is no easy place to tap on the coupler to drive it on the shaft. Do you leave that seal and retainer pulled back and tap on the coupler housing then attach the seal and clip?
 
I always install it on the shaft first, make sure all your splines slide together easy, then 4 tack welds on the cover with a wire feed if it is not a "restoration", never fails then. For a restoration you put weld tacks on the raised ribs, file them sharp on the forward edge, then install the steel cover with c-clamp vice grips, or in a vice to get it tight, then coin the 4 sheet metal tabs with a dull chisel.
 
Being an eternal optimist, I thought that I might be able to get the Firm Feel chuck out without removing the header.
I wasn't.
First, I pulled the torsion bar and moved it rearward.


Borg 39.JPG


I unbolted the box and rotated it around but it wasn't enough.
I took the LH motor mount bolt out and jacked the engine up.
Borg 40.JPG


Borg 41.JPG


Borg 42.JPG


Still not enough. This damn thing looks like it should be able to clock, twist or turn a bit and come right out but NOOoooooo.
It annoyed me....Why did Ma Mopar make this chuck so friggin big? They used the same behemoth unit for more than 30 years essentially unchanged. They never even streamlined it like they did with other parts like disc brake knuckles.
I loosened the bolts on the header so it could sway around a bit.
That didn't provide enough room either. All that was left was to pull the header.

Borg 43.JPG


Borg 47.JPG


The header came right out with the starter and spark plugs in place...TTI 2 inch with a 3.5" collector. With the header out, the steering box extraction was like pulling it off a shelf.
I weighed the FF unit and Fast Ratio arms....

Borg 45.JPG


Yeah...43 1/2 lbs. For a reminder, here is the Borgeson unit again:


Borg 46.JPG


29 1/2. This is a 14 lb weight reduction from the front. This is an excellent bonus.
I decided since the header was out, I'd clean and repaint it.

Borg 44.JPG


Looking at the difference in length, no wonder these longer F/R arms can be a no-go with some headers.

Borg 38.JPG
 
Getting it in the car can be a real pain alone, things that slide together out of the car always seem to stick going in, two people and wiggle and tap. Sometimes the roll pin raises a little metal inside the coupler, or burrs the steering gear shaft, that's why I check it all before attaching the coupler to the column.
 
Are you talking about this?
I have seen those and am aware that they are available.
My question may be unanswerable but is this: Why have I had trouble installing almost every steering column and coupler to the steering box? Some guys claim that theirs just fell right onto the shaft. I have never had one slide on easy. Every one had to be tapped into place, some needing more force than others. It makes me wonder if some of the ones I've installed had the master spline off by a slight amount. I've had units out of a car where I could clearly see everything and still had to use a hammer to tap it on. It would be really nice to have one just slide on with the push of my hand. Even this Borgeson unit is a snug fit and these parts are all new. No pitted input shaft, no mis-shapen hole in the coupler...
That is why I used this neoprene boot:

Borg 35.JPG
 
I have seen those and am aware that they are available.
My question may be unanswerable but is this: Why have I had trouble installing almost every steering column and coupler to the steering box? Some guys claim that theirs just fell right onto the shaft. I have never had one slide on easy. Every one had to be tapped into place, some needing more force than others. It makes me wonder if some of the ones I've installed had the master spline off by a slight amount. I've had units out of a car where I could clearly see everything and still had to use a hammer to tap it on. It would be really nice to have one just slide on with the push of my hand. Even this Borgeson unit is a snug fit and these parts are all new. No pitted input shaft, no mis-shapen hole in the coupler...
That is why I used this neoprene boot:

View attachment 1289718
I've also needed to tap them on most times
 
I got the manual box out pretty easily but I removed the T/bars and LCA's beings how I was doing a complete front end rebuild. Didn't have to remove the header.
I use a little grease on the splines to help to coupler go on and helps if I have to remove it later on.
 
You really would not want the splines to be loose, just a slight interference fit.
 
Today's update:
It is almost finished. In the first part of the day, I went out for supplies. I needed header paint and a few other things. One speed shop wanted $22 for a can!

Borg 49.JPG


Borg 50.JPG


Drill bits and Zerks since I am taking the advice of Rick Ehrenberg and putting a Zerk in the coupler.

Borg 52.JPG


I wanted to use the Mopar long fiber grease but my local dealer said it was discontinued and the only cartridge in the system is in Illinois.
I went with this...

Borg 53.JPG


It should be fine.

Borg 54.JPG


The steering box mounting bolts were cleaned and the Locktite was ready. A few months back, I took a 185 mile day trip and by the end, the steering felt numb. The bolts had loosened up a bit so I cleaned them and reapplied the Locktite. This time, they were still dang tight when I removed them.

Borg 55.JPG


I attached the fittings to the steering box while on the bench. In retrospect, doing so with the box in place would have been okay too,

Borg 56.JPG


Borg 57.JPG
 
It’s not looking too bad so far KD. Interesting to see how it feels when you get to try it out on the road. Great pictures and information. :thumbsup: :thankyou: :thankyou: :luvplace: :usflag::moparsmiley:
 
Auto Transport Service
Back
Top