• When you click on links to various merchants on this site and make a purchase, this can result in this site earning a commission. Affiliate programs and affiliations include, but are not limited to, the eBay Partner Network.

Start of my '69 Charger restoration

camtra

Well-Known Member
Local time
10:34 PM
Joined
Sep 6, 2015
Messages
318
Reaction score
128
Location
French Settlement, Louisiana
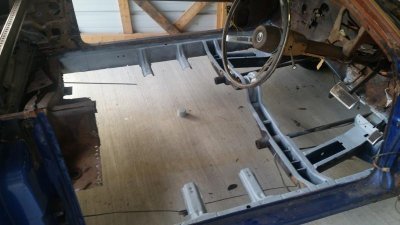
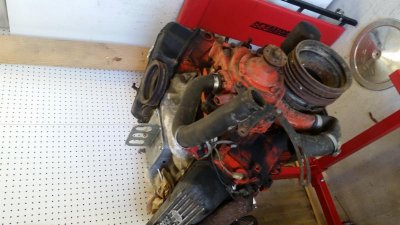
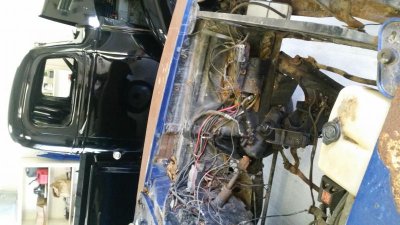
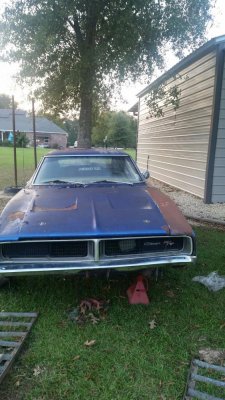
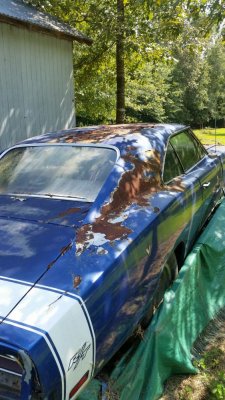
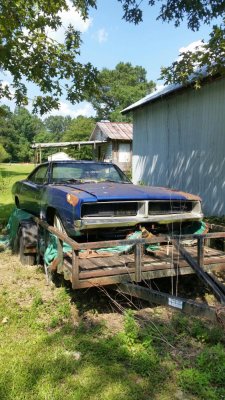
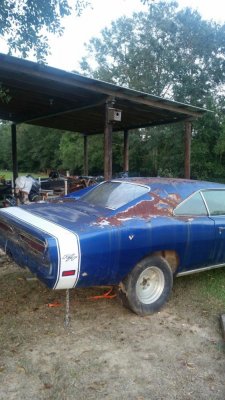
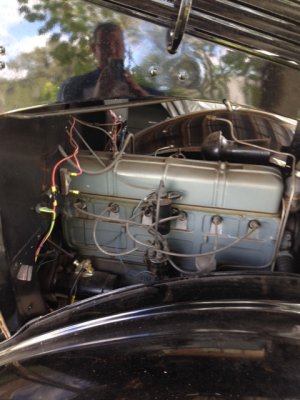
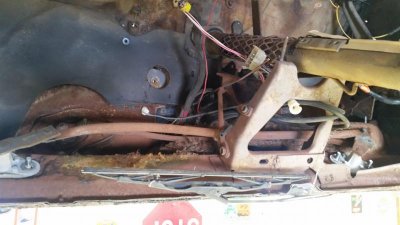
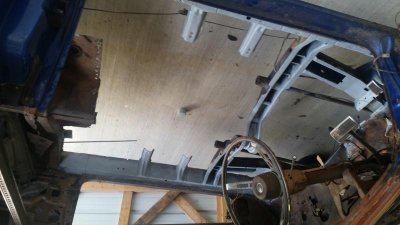
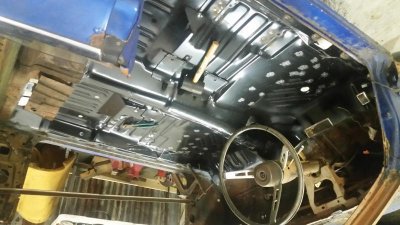
A few pics from my start. Don't get too excited as this is just the beginning of a long road. :icon_wink: The 440 is pulled and on engine stand, the tranny is pulled along with the gas tank and exhaust. My floor pans will be in Monday and I will begin the tedious process of removing and replacing the 3 floor pans. I do have a question, looks like my wiring harness is in great shape and I want to save as much as I can. Question is what do I do with all the wires when I get to the cleaning and repainting the engine bay? Any suggestions are welcomed.

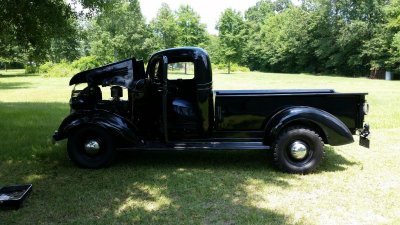
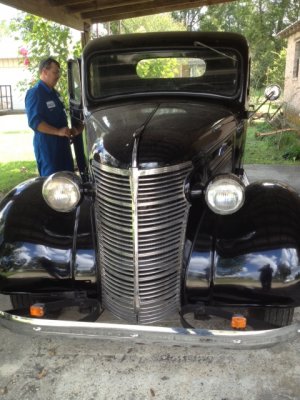
Not sure why all pics came out sideways. Middle pic has my 1938 Chevy Pick Up in the background. All original.
 

Attachments

  • 20151114_130514.jpg
    20151114_130514.jpg
    57.1 KB · Views: 625
  • 20151114_130458.jpg
    20151114_130458.jpg
    64.8 KB · Views: 580
  • 20151114_130534.jpg
    20151114_130534.jpg
    68.6 KB · Views: 581
I would take as much of the wiring off that you can and tape up what you can't easily remove.. Love them 69s, just a hair less than 68s..
 
Sorry, a few more pics. I bought the car from a family member for dirt cheap. It was originally a 318 car but was made into an RT clone at some point. It has a running 440. I'm going threw the car completely. Engine and tranny is pulled. All 3 floor pans were delivered Monday so that is the first step. As I get time I will be removing and replacing the pans then will move on to the engine bay.
Here are a few pics of the old girl. I am leaning to black with black interior but I haven't ruled out Plum krazy Purple.
 

Attachments

  • cahrager10.jpg
    cahrager10.jpg
    121.1 KB · Views: 459
  • charger1.jpg
    charger1.jpg
    124.3 KB · Views: 470
  • charger2.jpg
    charger2.jpg
    152.6 KB · Views: 455
  • charger11.jpg
    charger11.jpg
    107.6 KB · Views: 437
My first car was a '69 Charger, my favorite Mopar. On my Coronet resto I went with M&H wiring harnesses, sold exclusively through Year One. The harnesses are factory color coded, correct Packard 56 connectors. Or you can rewire yourself using Ron Francis or Painless kits that are make and model specific. Depends upon how "correct" you're planning your resto. Good luck on your project.
 
Awesome score, I'm another 69 Charger guy............. it's the grill!!!!!!!! I'd remove all of the wiring along with everything else in the engine compartment, trying to work around things is usually more of a pain than just getting it out of the way in the first place. Love the pickup too...
 
A few pics of my old Chevy Truck. It's a 1938 3/4 ton and all original. It's very fun to drive and to show just not very fun to cruise any distances. That's why I'm ready for this Charger!!:headbang:
 

Attachments

  • 20140726_142718_resized_1.jpg
    20140726_142718_resized_1.jpg
    81.1 KB · Views: 355
  • truck3photo.JPG
    truck3photo.JPG
    158.9 KB · Views: 401
  • truck 2photo.JPG
    truck 2photo.JPG
    126.9 KB · Views: 371
  • truck5.jpg
    truck5.jpg
    76.7 KB · Views: 400
Question on removing wipers

Here's a few more pics of my progress. The front floor pan is tacked down and will finish welding this weekend and then move onto the next floor pan. I'm trying to remove my wipers. Can anyone shoot me a tip on taking these bad boys off? I still haven't figured out yet why some pics show up upside down....I've tried everything to make them show up correct.
 

Attachments

  • 20151125_151709.jpg
    20151125_151709.jpg
    49.5 KB · Views: 365
  • 20151127_160023.jpg
    20151127_160023.jpg
    47.6 KB · Views: 365
  • 20151127_182905 - Copy.jpg
    20151127_182905 - Copy.jpg
    62.8 KB · Views: 406
Here's a few more pics of my progress. The front floor pan is tacked down and will finish welding this weekend and then move onto the next floor pan. I'm trying to remove my wipers. Can anyone shoot me a tip on taking these bad boys off? I still haven't figured out yet why some pics show up upside down....I've tried everything to make them show up correct.


When I uploaded using my iPhone they would always be upside down. When I want to upload with it I take a screen shot of the photo and upload the screen shot, that seems to work. Cool project, I as well am a 69 charger guy!
 
Looks like a nice straight example to start with. Good score! Remove everything, you will like the results much better.
 
Hope your good at welding over head! lol. Just kidding. Your doing a good job!
 
Pretty cool project!!!, GOOD luck to you. I hope these pics help, if there right anyway lol...69 chargewr restore.jpg

69 chargewr restore.jpg

- - - Updated - - -

well, i think i fixed one :( sorry buddy...
 

Attachments

  • 69 RESTORE CHARGER.jpg
    69 RESTORE CHARGER.jpg
    98.7 KB · Views: 251
A few more pics of progress. rear.JPGrear3.jpgtrunck.jpg

- - - Updated - - -

fender2.jpgmolasses.JPG

Trying to save this fender with a vat of molasses and water. Been in there for over 2 weeks. I'm taking it out today to see how it went!!!
 
I love the molasses, I use it a lot. My wiper arms were stuck on the spline shafts and took some wd-40 and some prying to get them off, not sure if that's you're problem. And on second thought, I retract my previous suggestion and recommend taking the wiring off., Didn't realize how far you were going.
 
Sorry, I should have updated more. I have the wipers off now along with all the linkages. I have them soaking in molasses and water now and will clean off and paint before reinstalling.

I'm working on the trunk pan and rear end now. All rear end is rusted out so replacing the rear valance, tail light panel, cross rail, truck gutters, trunk pan extenders and the corner pieces. Waiting for metal now before I weld trunk pan in. It's been fitted and holes drilled, just waiting for rear cross member before I weld. Rear ends seems like a jigsaw puzzle. :thinker:

Once I finish that I'll save up some money to order both rear quarters. In between I'll continue to clean and weld some parts.
 
I must say, I'm having fun doing it. Although, I went into it fully understanding that I'll have more money into it than probably it'll be worth, along with it being a long process to complete. But I can also say I'm learning quite a bit as I go.
 
View attachment 300756fender3.JPG

Pulled my fender out of the molasses and water yesterday and here is a before and after pic. The spot in the middle of the after pic is where the fender was laying on the bottom. Note to self--prop those up with something in the future.

I'm pretty pleases with the results and may save me a few hundred $$$ that I can spend somewhere else.
 
I realized I'm right a 1 year since starting my restore project of my 69 Charger and I wanted to share a few pics. I've been working a pretty good bit of OT and haven't been working on it as often as I'd like. So here are a few pics of my progress. I am currently working on the rear of the car. I have the back axle off and cleaning and will repaint it. The seal at the shaft started leaking on me so I'm in the process of taking the axles off to pull it off and send to get the seal changed. In the mean time I'm changing all the bushing on the leaf springs before I put them back on. More pics to come as I make progress.

As always, please share freely any tips/advice.

Axlegear.JPG Driverquarter.JPG image5.JPG Rear Valance.JPG
 
Auto Transport Service
Back
Top